BCC (blind carbon copy) in Outlook is used to send the same copy of the email to multiple recipients, but each recipient cannot see the email addresses of other recipients.
How to Add BCC in Outlook? Various Outlook Versions Covered With Additional Information
- How Does BCC in Outlook Work?
- How to Add BCC in Outlook App?
- How to Add BCC on the Web Version of Outlook?
- How to Add BCC in Outlook on a Mac?
- How to Show the BCC Field Permanently in Outlook?
- How to Set “Always BCC Myself” in Outlook?
- How to See the Recipients of a BCC Email You’ve Sent?
- BCC vs. CC: What’s the Difference?
- What are the Best Practices for Using BCC?
- Frequently Asked Questions
When using Outlook, have you ever come across a situation in which you need to send an email to multiple people but don’t want to share the email addresses?
In such cases, you must opt for BCC in Outlook. It is the most effective way to keep the emails professional and private. Sounds simple, right?
So, if you’re about to use Outlook for the first time or learning “BCCing,” this write-up will provide you with all the required information you need to know.
How Does BCC in Outlook Work?
BCC stands for “blind carbon copy,” and you must have heard about it several times in paperwork. However, the purpose is the same in Outlook as well—to send the same email to multiple recipients without letting any of them know about the other receivers.
Apart from that, it also removes the “reply to all” option for every receiver, which comes out to be effective when you’re working on email marketing campaigns or a lot of recipients have been added.
Nevertheless, it is suggested that you should not overuse the feature considering the general email etiquette. Now, coming to the main query, how to BCC in Outlook? Let’s take a look.
How to Add BCC in Outlook App?
To add BCC to the Outlook application, follow these steps:
- Click “New Mail” and go to “Options.”
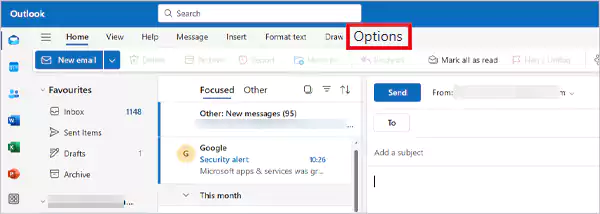
- Just after clicking Options, you’ll see some options right below it. Then, click on the box along with “Show BCC,” and you’ll see the BCC tab available in the email section.
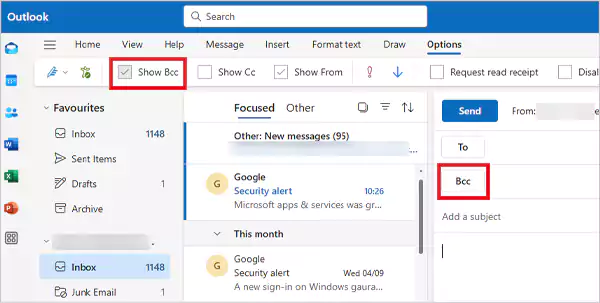
- Now, in the BCC field, manually type the addresses or select the recipients from the Address Book.
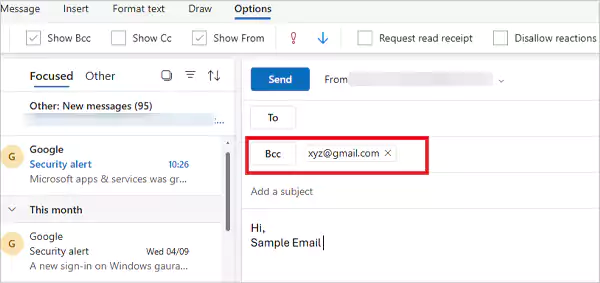
That’s it; you can send the email to the recipients with BCC on.
Pro Tip: If you’re replying to an email from the Reading Pane, the BCC tab will be present under the Message option.
How to Add BCC on the Web Version of Outlook?
If you prefer to use the web version of Outlook 365, you need to follow these steps to add BCC recipients:
- Click New email present on the top-left.
- From the new email section, click the BCC button.
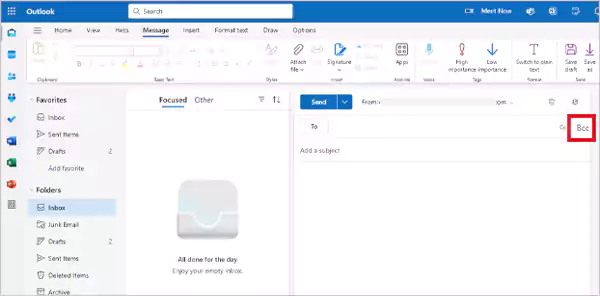
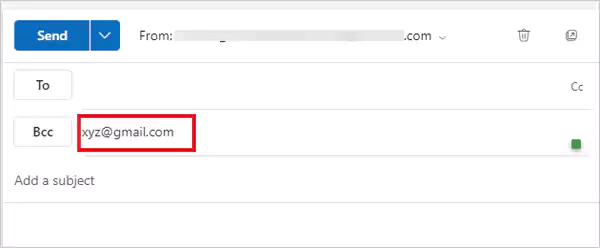
- Add the recipients and click the Send button.
How to Add BCC in Outlook on a Mac?
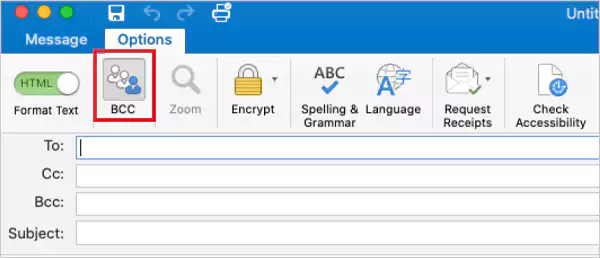
Adding BCC when using Outlook on a Mac would probably be the easiest of all methods. All you need to do is click the Options tab and then click BCC. That’s all.
How to Hide BCC in Outlook?
You can easily turn off the BCC feature for any emails to be sent in future. Just create an email or start replying to an existing one, then:
If the message opens in a new window:
- Go to Options tab >> Show Fields group, and click the BCC button to hide it.
If the message opens in the Reading Pane:
- Click the BCC button on the Message tab of the ribbon.
How to Show the BCC Field Permanently in Outlook?
If you don’t want to add the BCC button each time you compose an email, you can make it appear permanently by following these steps:
- Open and sign in to the web version of Outlook.
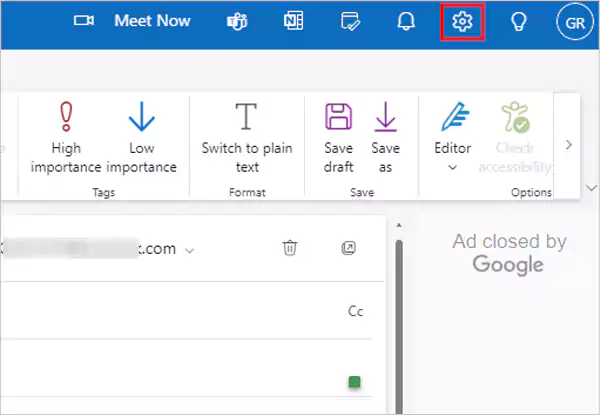
- Click the gear icon (Settings) in the top right.
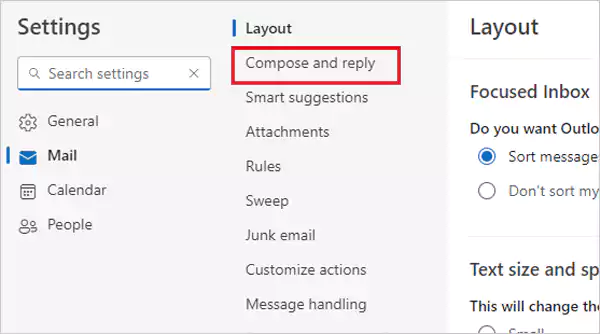
- Now, click the Compose and reply option.
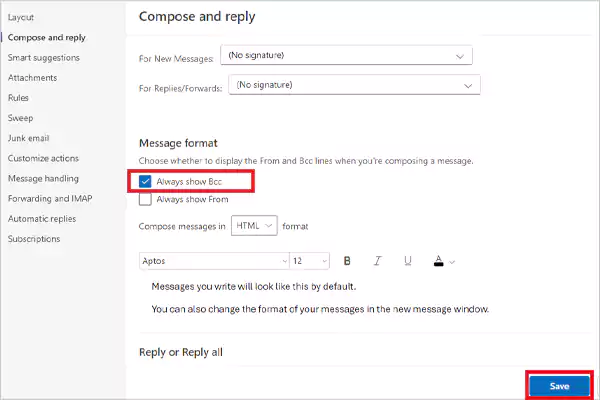
- Scroll down, and select the “Always show BCC” option under Message format. Then, click “Save” to save the changes.
How to Set “Always BCC Myself” in Outlook?
Adding yourself in BCC for every email is sometimes essential, especially when you need to keep copies of the messages sent to different recipients and from different devices.
Hence, the option “Always BCC Myself” can prove to be effective in such cases. Follow these steps to set that up:
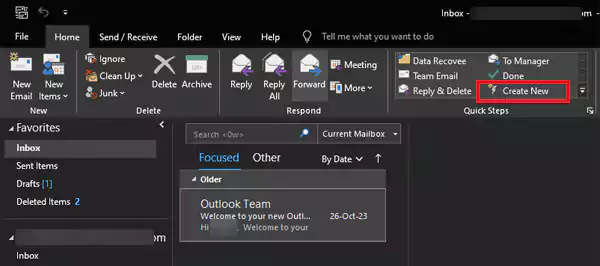
- From the Home tab, navigate to the Quick Steps group, and click Create New.
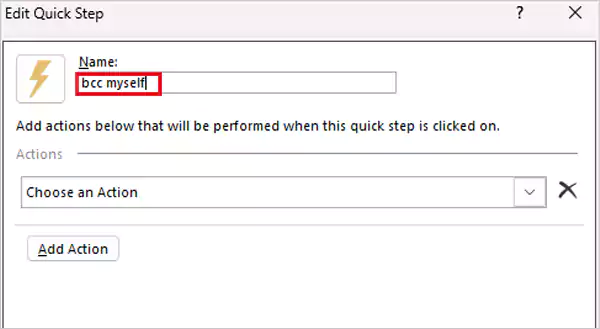
- Then, you’ll see the “Edit Quick Step” dialog box, in which you’ll have to fill out the sections. First, enter a descriptive name in the “Name” box, something like “BCC Myself” will work.
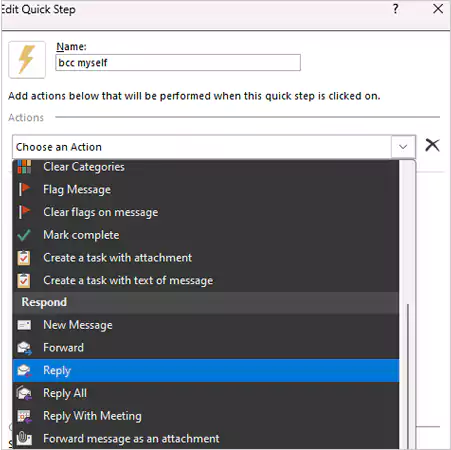
- Then, under “Actions” choose “Reply” from the drop-down menu.
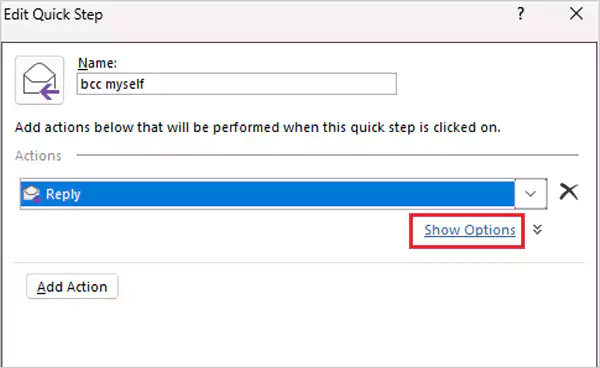
- Now, click the “Show Options” button.
- Click on the “Add BCC” link.
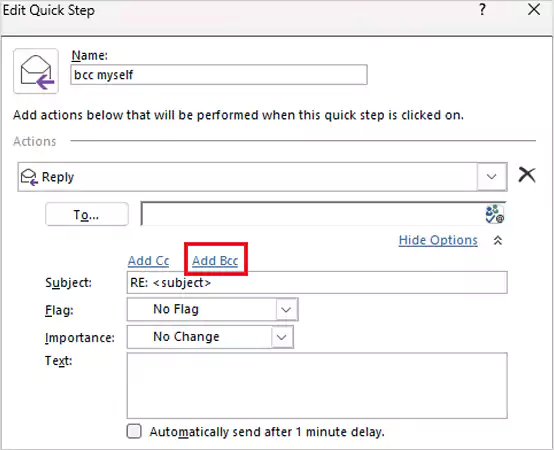
- Then, add your email address in the “To…” section and click “Finish” to complete the process.
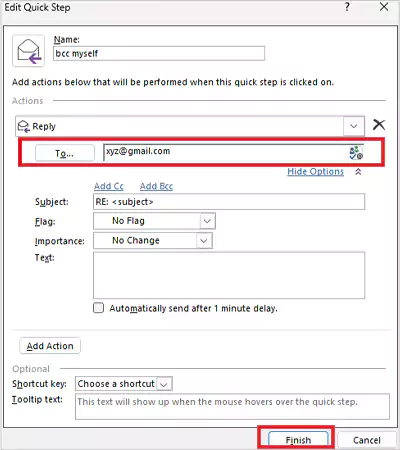
That’s it; now with every email you’ll send, you’ll be added as a BCC.
How to See the Recipients of a BCC Email You’ve Sent?
There might be a situation in which you have to cross-check the recipients added to the BCC list on a specific mail. So, in case you need to check that out, follow these steps:
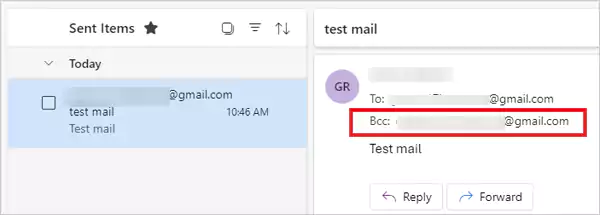
- Go to the Sent Items folder of your Outlook.
- Find the email you need to check and open it. If you’ve added any BCC recipients, their email addresses will appear in the header section only.
BCC vs. CC: What’s the Difference?
The primary difference between BCC and CC is that all the BCC recipients are hidden from other recipients, but each CC recipient can see the other recipients. Refer to this table for some other differences:
| BCC | CC |
| Keeps email addresses private. | Lacks the privacy factor. |
| Helps in avoiding spam filters and improves deliverability. | High possibility of emails being flagged as spam. |
| Recipients can’t “reply all.” | The “Reply all” option is available. |
What are the Best Practices for Using BCC?
If you haven’t used the BCC feature in Outlook or have no clue how to blind CC in Outlook, you must go through some of the best practices mentioned below:
Avoid Spam
Before you add a recipient or several recipients in the BCC of an email, make sure that they’re expecting a message from you. This is because the BCC technique is often used by spammers, and if the sender is not aware that they’re about to receive an email from you, it will go straight to the junk email folder.
Be Within the Limits
You should know that many email service providers have a set number of recipients users can add in the To, BCC, and Cc sections. For example, an email service provider can set a limit to 100 recipients for each email. So, be wary of these policies.
Be Careful About the Distribution List
If your recipient uses rules to sort their emails into folders, they’re more likely to face issues if you list the name of the distribution list in the BCC box. This is because it’s not possible that the rules set by you and your recipient are the same, so your message will not be sorted aCCording to their rules.
Frequently Asked Questions
What is BCC in Outlook used for?
What is the purpose of a BCC?
The purpose of using the BCC in emails is to add security and privacy factors to the emails sent.
Do BCC recipients see each other?
No, BCC recipients can’t see each other.
Are you seeing “This Video Cannot Be Played Error Code 233011” while trying to stream? Well, you are not alone,…
DID YOU KNOW? Reports says that 97% of consumer consider a company’s online presence before deciding to visit their business,…
Are you getting the “The video file cannot be played: Error Code 224003” message while watching a video online? This…
In 2023, the National Institute on Drug Abuse anticipates 20 million Americans will have had a substance use disorder, but…
Did you know? The most dominant types of errors in translation experienced by translators lie in surface structure, such as…
Did you know? Ransomware was responsible for up to 10% of data breaches in 2022 and cost the world about…
Are you getting the USB device not recognized error on your Windows 10 or Windows 11 PC? It usually means…
CSA Research reported that 76% of online buyers prefer to buy in their own language. This example illustrates how language…
Can you land a cybersecurity job without experience or a computer science degree in 2025? Yes, it is possible. As…

