To create a shared calendar in Outlook, go to the Calendar tab, open New Calendar, fill in the required details, and click OK.
How to Create a Shared Calendar in Outlook (and How to Share One)?
Microsoft Outlook offers a lot of exciting features and functionality to enhance the way you organize your professional life. If you want others to be updated about your schedules, sharing your personal calendar is never a great idea.
What you can do is have shared calendars and let other users take a look at them from their own accounts.
If you’re wondering how to create a shared calendar in Outlook, this blog has covered everything you need to know.
How to Create a Shared Calendar in Outlook?
Creating an Outlook shared calendar allows you to organize events, check if a meeting room is available or not, and schedule conference calls. To learn how to create one, follow these steps:
- Open Outlook and log in to your account if required.
- Then, click the Calendar View icon available at the bottom.

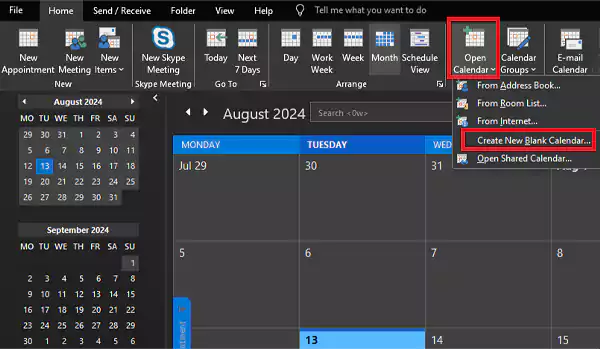
- Now, from the top, click the option ‘Open Calendar’ and select ‘Create New Blank Calendar’ from the drop-down menu.
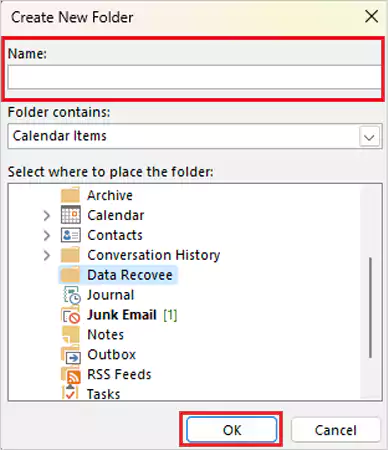
- Then, give a name to the calendar and decide where you would like to keep the files. Click OK to confirm.
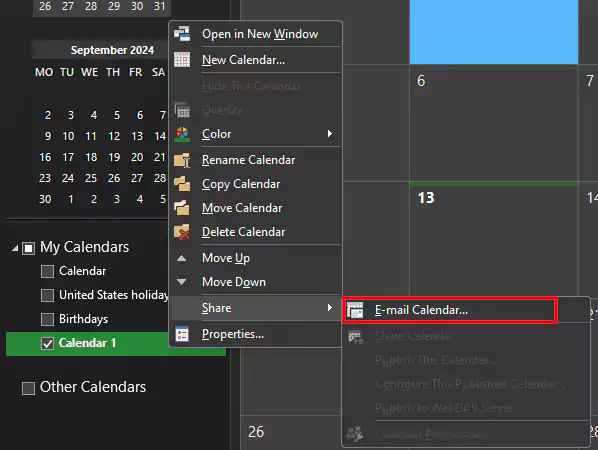
- This will create a new calendar, and it will appear on the left. Right-click on the calendar’s name you just created and go to Share >> E-mail Calendar.
- Send the email to the person you’d like to share the calendar with.
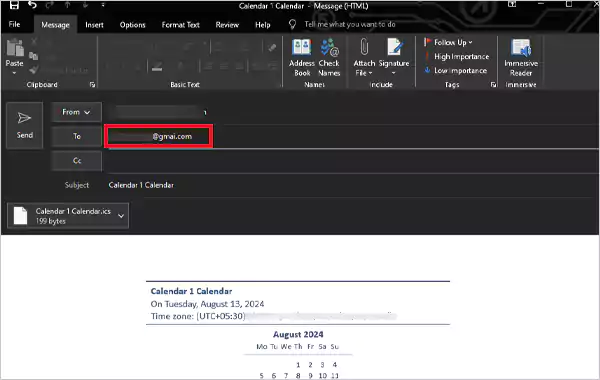
This will create a new calendar that can be shared with other email IDs. You can also change the permissions by opening the Properties tab and making the required changes.
How to Share a Static (View Only) Calendar Created in Outlook?
If you don’t want others to edit your calendar, you can share it as a static copy (view only) via Outlook. Here’s how you can do that:
- Open Outlook, select the calendar you want to share, and click the option ‘E-mail Calendar’ present at the top.
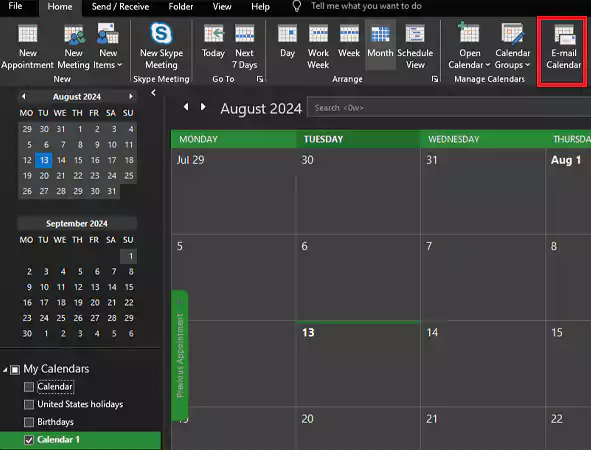
- Now, you need to mention the time period you want to share. So, select ‘Date Range’ from the option that appears on the screen. Click OK to save the settings.

- Enter the email address you want to share the calendar with and send the email.

Now you can send an invitation from a shared mailbox, which will contain a “see-only” version of the shared calendar along with the iCalendar (.ics) file. You can open this file in Outlook or any other program that supports this file format.
How to Share a Calendar by Publishing it to a Web Page?
If your organization supports the World Wide Web Distributed Authoring and Versioning (WebDAV) protocol, you can publish the calendars on a web page and share them with multiple users.
Before proceeding to the steps, make sure you confirm if your web server supports WebDAV. You can confirm that by asking your server administrator or Internet Service Provider.
- Click the Calendar option and navigate to the Home tab.
- Navigate to the option ‘Publish Online’ and click ‘Publish to WebDAV Server.’ This will publish your calendar on an Exchange server.
- Write the WebDAV server in the Location Box and click ‘OK.’
How to Share Your Outlook Calendar on Android and iOS?
To share your Outlook calendar on Android or iOS:
Install the Outlook app, open it, and go to Calendar >> Settings (gear icon) >> Add People. Add the email ID of the people you want to share the calendar with and adjust the permissions.
Top Reasons Why You Can’t Create a Calendar in Outlook
Giving Outlook calendar sharing permissions seems like a normal thing, but it gets sometimes complicated, and you may end up receiving the error “This calendar can’t be shared.” This happens due to the following reasons:
- Invalid Email Address: Avoid typing the incorrect email address when sharing a calendar. You must check the ID twice before sending or sharing anything.
- The Email Address Belongs to a Microsoft 365 Group: You can’t send a calendar invite if the email address belongs to a Microsoft 365 Group.
- The Email Belongs to an External: If you sent the invite to someone who isn’t a part of your organization, you won’t be able to create a calendar in Outlook.
- Outdated Software: If you’ve been using an outdated software version of Outlook, there’s no way you can create a calendar.
Furthermore, if you’re still facing issues, you must contact the IT department or refer to Microsoft’s official help documentation.
Summing Up
Outlook offers a suite of tools for learners and professionals, and one of them is creating and sharing calendars. No matter what kind of device you’re using, the platform offers a convenient way to share calendars. Using this feature, you can coordinate schedules and plan events with your colleagues, family members, and friends.
Frequently Asked Questions
How to make a shared calendar in Outlook?
What is the difference between a shared calendar and a group calendar in Outlook?
A shared calendar in Outlook is created by an individual and shared with specific people. And, a group calendar is associated with a whole team of a Microsoft 365 group.
How to create a shared Outlook calendar for multiple users?
Open Outlook’s calendar view, and go to: Add Calendar >> Create New Blank Calendar. Edit the required details, and go to Share Calendar >> Add.
Are you seeing “This Video Cannot Be Played Error Code 233011” while trying to stream? Well, you are not alone,…
DID YOU KNOW? Reports says that 97% of consumer consider a company’s online presence before deciding to visit their business,…
Are you getting the “The video file cannot be played: Error Code 224003” message while watching a video online? This…
In 2023, the National Institute on Drug Abuse anticipates 20 million Americans will have had a substance use disorder, but…
Did you know? The most dominant types of errors in translation experienced by translators lie in surface structure, such as…
Did you know? Ransomware was responsible for up to 10% of data breaches in 2022 and cost the world about…
Are you getting the USB device not recognized error on your Windows 10 or Windows 11 PC? It usually means…
CSA Research reported that 76% of online buyers prefer to buy in their own language. This example illustrates how language…
Can you land a cybersecurity job without experience or a computer science degree in 2025? Yes, it is possible. As…


