OST stands for Offline Storage Table. These files are used by Outlook to store data offline, such as emails and other items. And, to access this data within Outlook, one needs to import OST files into Outlook.
How to Import OST File into Outlook? Best and Easy Solutions Explained!
Updated on: Jul 15, 2024
OST files play a crucial role in storing a local copy of your mailbox data from an Exchange server, allowing you to work offline in Microsoft Outlook.
But when you need to open OST files or import them into Outlook due to changing your email client, moving to a new computer, or recovering from a data issue – you’ll find it challenging.
Well, because of their unique format and specific usage requirements, OST files cannot be imported directly into Outlook like other file types.
So, if you’re looking for ways to import OST files into Outlook, you’ve come to the right place. This guide will explain why importing OST files into Outlook is necessary and provide detailed steps to do it.
Why Import OST File into Outlook?
Importing an OST file into Outlook becomes necessary for several reasons, including these—
- Recover Data from a Damaged Account: If your Outlook account or mailbox becomes corrupted or inaccessible, you might still have the data stored in the OST file on your computer. So, importing this OST file into Outlook helps you regain access to your emails, contacts, and other data.
- Moving to a New Computer: When you switch to a new computer, you also need to transfer your Outlook data because it’s tied to the old computer and account. So, importing them into Outlook on the new computer allows you continuous and seamless access to your mailbox data.
- Accessing Data from a Different Profile: Sometimes, you need to access Outlook data from a different profile. That’s when importing the OST file into Outlook as a PST file is required to view and manage the data from it.
All in all, importing an OST file into Outlook is necessary when you need to recover data from a damaged account, switch to a new computer, or access data from a different profile.
Where to Find the OST File Location in Your System?
The process of importing an OST file into Outlook starts with finding its location in your system. So, here’s how to find the OST file location depending on your Windows version—
- Windows 10/8/7/Vista: C:\Users\username\AppData\Local\Microsoft\Outlook
- Windows XP: C:\Documents and Settings\username\Local Settings\Application Data\Microsoft\Outlook
Alternatively, you can follow these to find the file location—
- Step 1: Click on the Start icon on the Windows desktop.
- Step 2: Then, type Control Panel in the search bar.
- Step 3: In the Control Panel, select the Mail applet and click on Data Files.
- Step 4: After that, in the Data Files dialog box, you’ll find a list of all data files linked to your Microsoft Outlook profile.
- Step 5: Now, you’ve to identify the OST file associated with your email account.
- Step 6: Once identified, select Open File Location.
- Step 7: Now the Folder that contains the OST file will be displayed on your computer screen.
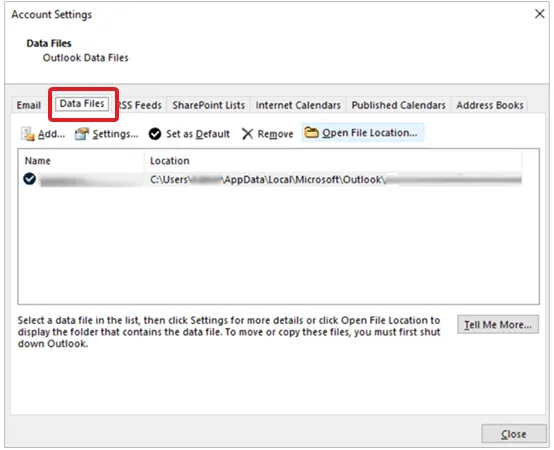
However, if these steps are not working for you, you can also locate the OST file by checking the account settings in Outlook under Data Files using these steps—
- Step 1: Open Microsoft Outlook and go to the File tab.
- Step 2: Inside the file tab, click on Account Settings from the main interface.
- Step 3: Then, in the Account Settings dialog box, select Data Files.
- Step 4: After doing this, you’ll see a list of data files associated with your Outlook profile.
- Step 5: Now, you just need to identify the OST file linked to your email account and note its location listed in the Path column.
How to Import OST File into Outlook?
Once you know the location of the OST file, you can import it into Outlook using these steps—
Step 1: Convert the OST File to PST
Since OST files are associated with a particular user account and computer, they can’t be opened directly in Outlook. Therefore, you must convert OST to PST files first. Converting them to PST format allows them to be easily opened and managed. This ensures that you don’t lose important emails and other data during transitions or when recovering data.
Option 1: Using Outlook Import/Export Wizard
Unlike having to manually export Mac Outlook 2016 to PST, Outlook’s import/export feature allows exporting Outlook messages, items, tasks, notes, etc., into PST format easily. So, if you want to convert OST file to PST using the import/export feature, follow these steps—
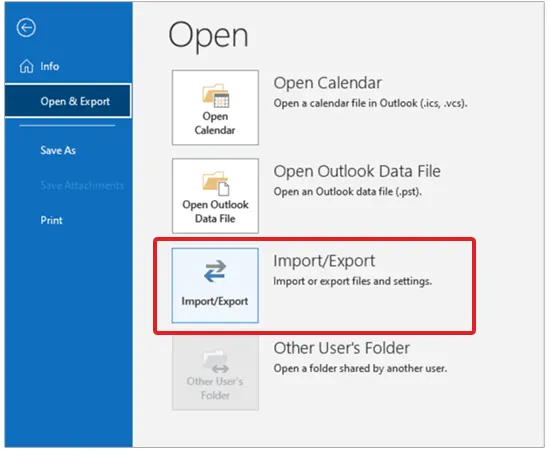
- Step 1: Open Microsoft Outlook and go to the File menu.
- Step 2: Then, select Open & Export from the dropdown.
- Step 3: Next, click on Import/Export.
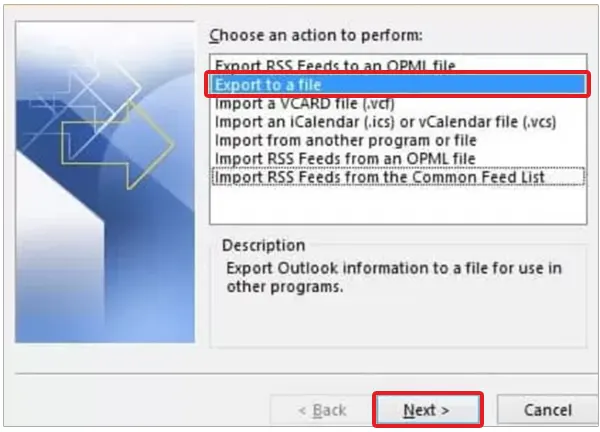
- Step 4: After that, choose Export to a file and click Next.
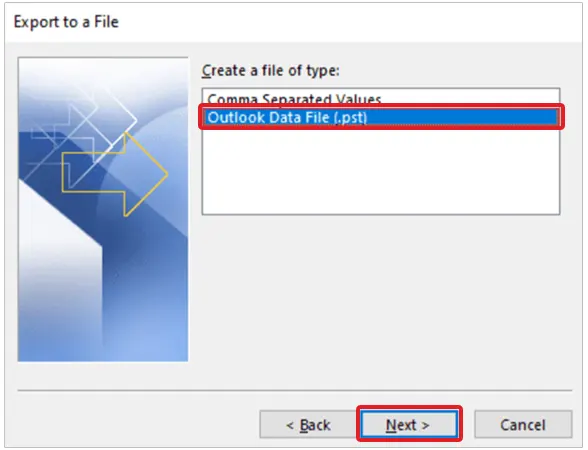
- Step 5: Now, click on Outlook Data File (.pst) and hit Next.
- Step 6: Upon doing so, select the Folders you want to export and click Next.
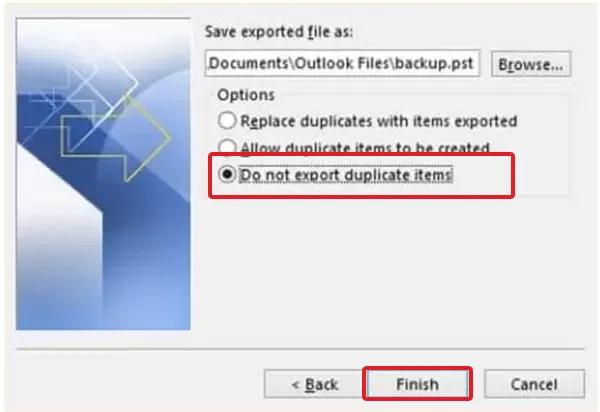
- Step 7: In the end, choose a Location to save the PST file, also select the Do not export duplicate items option and then, click Finish.
With these steps, you can export your Outlook data to a PST file easily.
Option 2: Using Drag and Drop Method
Outlook also allows you to easily move OST file items into a new PST format using the drag and drop method. To use it, follow these steps—
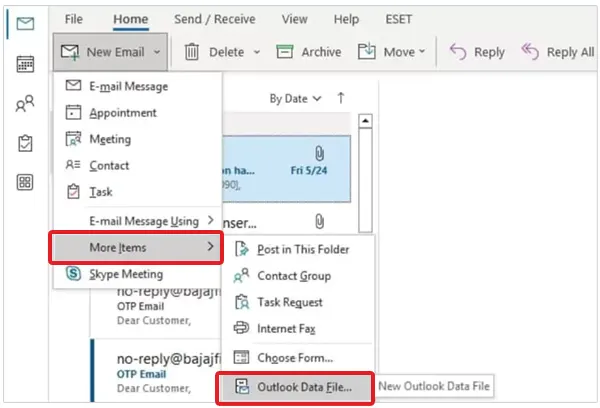
- Step 1: Launch Outlook and click on New Email.
- Step 2: Then, select More Items > Outlook Data File to create a new PST file.
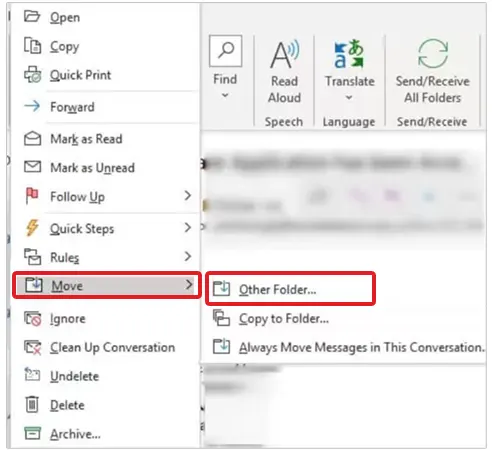
- Step 3: After that, select the Emails you want to move, then right-click and choose Move > Other Folder.
- Step 4: Now, select the newly created PST file and click OK to copy the OST file items into the new PST file.
Option 3: Using the Archive Feature
In Outlook, you’ll get built-in features to efficiently manage emails, including archiving OST files into PST format. So, if you choose to use the archive feature, follow these steps—
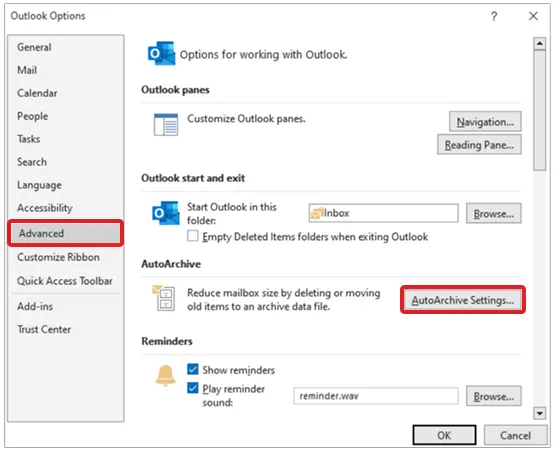
- Step 1: Open Outlook and click on the File tab.
- Step 2: In the File tab, select Options from the left panel.
- Step 3: Then, choose Advanced and click on Auto Archive Settings.
- Step 4: After that, configure the auto archive settings based on your requirements. You can specify the day count and criteria for achieving old mails.
- Step 5: Once this is done, click Ok.
- Step 6: Now, Outlook will automatically create a PST email archive for your OST files.
- Step 7: In the end, verify the archive’s location to ensure it’s saved where you intend.
Option 4: Using an OST to PST Converter Tool
You can also use a converter tool such as Advik OST to PST Converter and Stellar Converter to convert OST to PST via following these steps—
- Advik OST to PST Converter
- Step 1: Download and Install Advik OST to PST Converter from the official website.
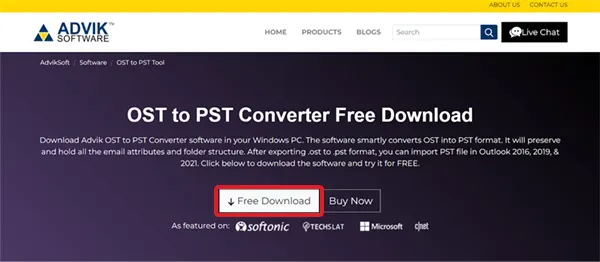
- Step 2: Once installed, launch Advik OST to PST Converter.
- Step 3: Then, click Select File and add your Outlook.ost file.
- Step 4: After that, choose the mailbox folders you want to convert and click Next.
- Step 5: Now, select PST as the saving option and click Convert.
- Stellar Converter to convert OST to PST
- Step 1: Download and install Stellar Converter for OST from the official website.
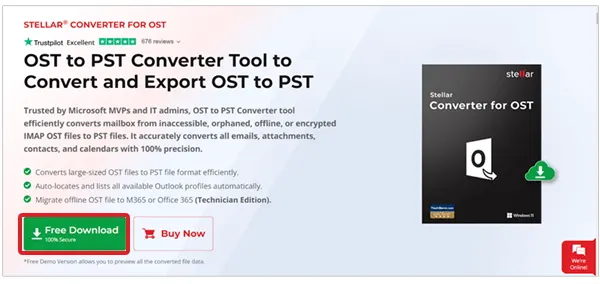
- Step 2: Once downloaded, open Stellar Converter and click on Browse to find and select the OST file you want to convert.
Tip: You can click Find if you are unsure of the OST file location.
- Step 3: Then, click Convert to start scanning the selected OST file.
- Step 4: After the scan, preview the mailbox items displayed by the software.
- Step 5: Now, select the specific items or folders you want to convert to PST.
- Step 6: Upon doing so, click on Save Converted File.
- Step 7: Following this, choose PST as the format and select a Location on your computer to save the PST file, then click OK.
- Step 8: Now, wait for the software to complete the conversion and save the PST file.
When you’re done saving, open Microsoft Outlook and import the PST file to verify that you’ve successfully converted the OST file to PST.
Step 2: Import PST File in Outlook Using the Import/Export Feature
After converting your OST file into PST, you can follow these steps to import the PST file into Outlook to access its content—
- Step 1: Open Outlook and go to the File tab.
- Step 2: Inside the file tab, select Open & Export.
- Step 3: Then, click on Import/Export.
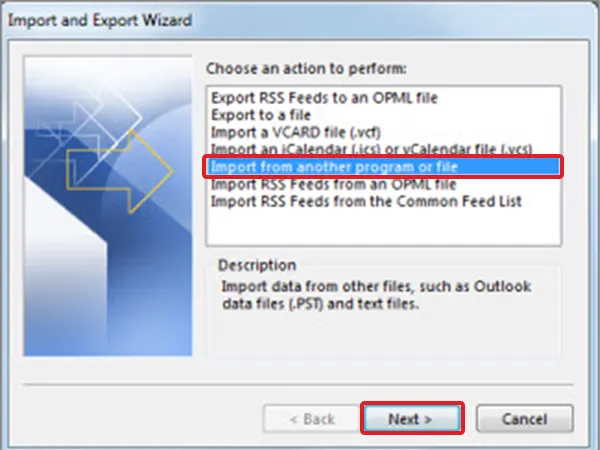
- Step 4: After that, choose Import from another program or file and click Next.
- Step 5: Select Outlook Data File (.pst) and click Next.
- Step 6: Hit the Browse option to locate the PST file and check the Replace duplicates with items imported box.
- Step 7: Upon doing so, choose the destination folder to import from and click Finish.

- Step 8: In the end, just make sure to verify the import.
So, with the steps of these two parts, you can easily convert the OST file into PST format and import it into Outlook.
What Are Some Common Issues When Importing OST Files into Outlook and How to Deal with Them?
It has been noticed that people encounter problems when importing OST files into Outlook. So, let’s discuss some common challenges faced during the process, followed by practical solutions to overcome them—
Issue 1: OST File Corrupted
OST files can become corrupted due to various reasons, such as sudden system shutdowns, network issues, or software errors. If corrupted, you can’t get proper access to data within the OST file.
- Solution: You can use built-in Outlook repair tools like ScanOST.exe or third-party recovery software to scan and repair the corrupted OST file before conversion.
Issue 2: Large OST File Size
Large OST files can pose challenges during the import process, such as longer processing times and other potential errors. They may also exceed size limits imposed by email servers or software.
- Solution: You can use a specialized converter tool that can split the large OST files into smaller parts. This helps you avoid issues and improve performance during the import process
Issue 3: Incompatible Outlook Version
OST files are linked to specific versions of Microsoft Outlook. If you attempt to import an OST file into an incompatible version of Outlook, you may experience compatibility issues.
- Solution: To ensure that the Outlook versions you’re working with are compatible, consider converting OST files using tools that support your respective Outlook version.
Issue 4: Duplicate Items
Duplicate items within OST files can arise in a number of ways, such as from synchronization issues, multiple accounts, or import/export processes. Not only can they clutter the mailbox, but they also lead to confusion.
- Solution: There are Microsoft built-in tools that scan and help you detect and remove duplicate emails, contacts, or other items. Other than these, several third-party tools also allow you to clean up duplicate items after importing an OST file into Outlook.
Bottom Line
That’s all! Hopefully, now you know how to convert, import and manage your OST files with hardly any effort.
Importing OST files into Outlook means bringing your offline data into Microsoft Outlook. With the correct features and tools, this process of importing an OST file to PST becomes very easy.
Doing so ensures you can access and manage your data across different accounts or devices with ease.
Frequently Asked Questions
What is the full form of the OST file?
Can I import an OST file directly into Outlook?
No. You cannot directly import an OST file into Outlook. Rather, you need to convert the OST file to PST format first to import it into Outlook.
How do I use an existing OST file in Outlook?
To use an existing OST file in Outlook, you need to convert the OST file to PST using a converter tool. Once converted, you can then import the PST file into Outlook.
What is the best tool to convert OST to PST?
There are various reliable tools available using which you can convert OST to PST. For instance, Advik OST to PST Converter, Stellar Converter for OST, Aryson OST to PST Converter, Kernel for OST to PST, and others.
How do I set up an OST file in Outlook?
To set up an OST file in Outlook, configure your email account in Outlook. It will create an OST file automatically if you’re using an Exchange, Office 365, or IMAP account.
How to avoid data loss during OST file import?
To avoid data loss during OST file import, you should use a reliable OST to PST converter tool and then, ensure a backup of your original OST file.
Can I access my OST file data without an internet connection?
Yes, OST file data can be accessed without an internet connection. Well, because OST files are designed to allow offline access to your mailbox data.
How often should I archive my OST files?
To manage size and ensure data safety, it is recommended that you archive your OST files periodically.

Related Posts
Why Modern Organizations Depend on Data Privacy Software
Data growth has significantly accelerated beyond what most compliance teams can manage, with personal records, financial details, contracts, and emails…
Converting Chats Into Leads While Maintaining Professionalism
The way marketing teams and businesses approach their potential clients to boost their sales has completely transformed in the last…

How to Delete iCloud Account? Complete Guide for 2026
Thinking, how can I delete iCloud or Apple account? It is not just about removing an account; it is about…
How Different Industries Use Specialized Software to Stay Competitive
In the market we have today, companies are always trying to find ways to work better and get results. The…
What Key Adjustments Enhance Visual Appeal Across Web Pages
Attractive web pages form the roots of any appealing website. For instance, imagine looking for content on Google, and you…
When is it Time to Consider IT Support Services for Your Business?
Every business needs to ensure smooth operations for a successful business. But despite trying hard to avoid barriers, technical issues…

How to Delete User Profile in Windows 10: Step-by-Step Guide
You don’t notice user profiles until one starts causing problems. A profile gets corrupted, a login error pops up, or…

How AI Can Help Students Take Notes and Check Their Work
Artificial Intelligence is transforming how students learn, study, and manage their academic work. From automating note-taking to checking assignments, AI…

How to Stop Windows Update: Pause, Disable, or Uninstall Safely
Imagine that face when Windows starts updating with a deadline looming and your screen freezes. Frustrating is an understatement, and…