Yes, it does delete the files permanently. However, if it was an accident and you want to recover those files, you can do so by acting quickly and using recovery software.
How to Recover Emptied Trash on Mac [4 Simple Methods]
Updated on: Nov 29, 2025
Table of Contents
- Can You Restore Emptied Trash on a Mac?
- How to Recover Emptied Trash on Mac Without Software?
- How to Recover Emptied Trash on a Mac Using Software?
- Recover Emptied Trash From Mac: What Works Best in Different Scenarios?
- How to Protect Your Mac From Permanent Data Loss?
- Final Thoughts
- Frequently Asked Questions
Accidentally emptied the Trash on your Mac and now need those files back? Most users assume everything is gone (just like “Thanos snap”), but macOS often leaves recoverable traces behind that make the recovery possible.
Consider me the Doctor Strange of the Data Recovery universe. I will explain how to recover emptied Trash on Mac with or without software.
The guide explains what happens after deletion, what works for your case, and how to avoid actions that can permanently erase data.
So, if you want to recover files from the emptied trash, this is the right place to begin.
Quick Glance (If You’re in a Hurry)
- Recovering Emptied Trash Without Software: Use the Time Machine snapshots, check iCloud, or use the Terminal.
- Best Data Recovery Software: Disk Drill, EaseUS, and PhotoRec.
- Avoid writing new data after accidental deletion to maximize the chances of recovery.
- A Mac with HDDs has a larger recovery window than a Mac with SSDs due to TRIM.
Can You Restore Emptied Trash on a Mac?

Yes, you can get files back even after emptying the Trash. When you click Empty Bin, macOS removes the links that help the system locate your files. However, the actual data often stays on the drive.
So, until new data replaces that space, data recovery software and tools for Mac can still detect the old files and bring them back. The real difference lies in your timing and the type of storage you have.
What does this mean for you? Well, the first and most important thing is that you need to act fast for Empty Trash Recovery on Mac. Older HDD-based Macs have better chances of recovery, and the newer SSD models have a small recovery window.
How to Recover Emptied Trash on Mac Without Software?
Before you use advanced data recovery tools, macOS and other cloud services offer a few free ways to recover an emptied recycle bin. These options work only if the files were backed up or synced before deletion.
Option 1: Recover Using Time Machine
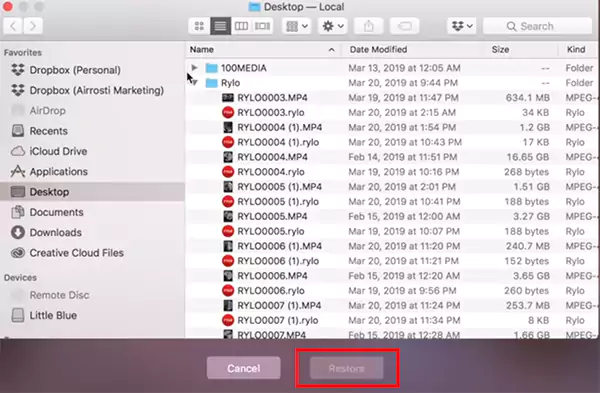
If you regularly back up your Mac device (which, by the way, you should), Time Machine is your best option to recover important files. Here’s how to restore using Time Machine:
- Click on the Launchpad from the dock and open Time Machine.

- Connect the drive you used for your Time Machine backup to your Mac.
- Next, scroll through previous backups and go to the folder where your file originally existed.
- Now, just select the file you want and click on Restore.
If your backup drive is not connected, your Mac may still have some local snapshots stored for the last 24 hours. You can try restoring that using the same steps as above.
Option 2: Recover Emptied Trash from Mac Using iCloud
If your files sync with iCloud Drive, you may also be able to recover them. Here’s how to restore from iCloud:
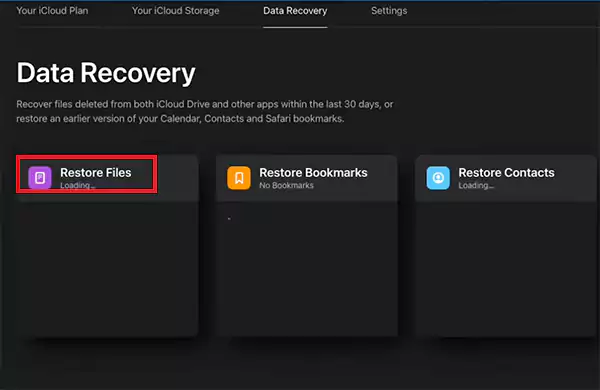
- Open iCloud.com and log in to your account.
- Click on the account icon and choose iCloud Settings.

- In the Data Recovery section, select Restore Files.
- Choose the files you want or select all of them together by clicking on the Select All option.
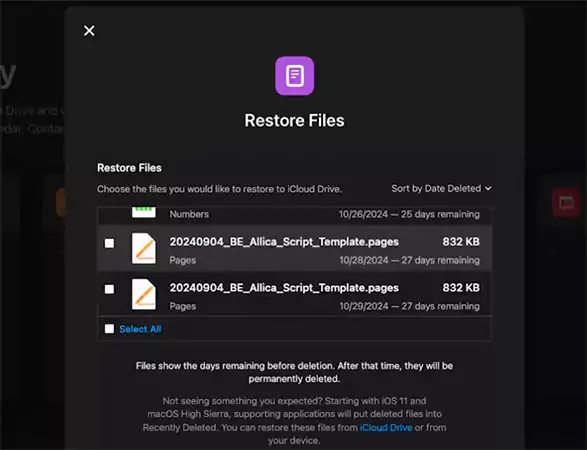
- Now, just click on the Restore Files button to send them back to your Mac.
If you cannot locate the file, do not forget to check the Recently Deleted folder in iCloud. Items deleted from iCloud stay there for 30 days.
You can also recover an emptied recycle bin on Mac from platforms like Google Drive or Dropbox. They can help in a similar way if you have synced or uploaded files earlier.
Option 3: Recover Emptied Recycle Bin Using Terminal
Terminal can also help you if the deleted file is still hidden inside the Trash folder before permanent removal. Try the following steps if the file was removed recently:
- Press Cmd and Space, type Terminal, and launch it.
- Here, enter ‘cd .Trash’ and press Return.

- Now, type ‘mv filename ../’ to move the file out of Trash (replace filename with the actual name of the file you want to recover).
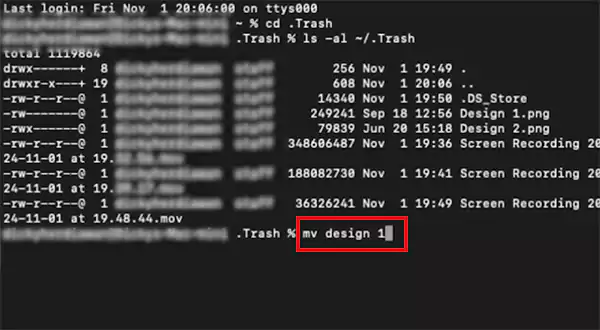
- Close Terminal and search for the file in Finder.
- Finally, just move the file to a safe location.
Again, remember that this method works only to show the hidden files on Mac that exist in the Trash directory.
How to Recover Emptied Trash on a Mac Using Software?
As I mentioned earlier, when a file disappears from the Trash, it still exists on the storage drive for a short period. Data recovery software takes advantage of this by scanning the drive, identifying leftover file patterns, and rebuilding them before the system overwrites that space.
Here is a simple breakdown to learn how to recover files from an emptied Trash using third-party software:
- Download and install the recovery software of your choice.
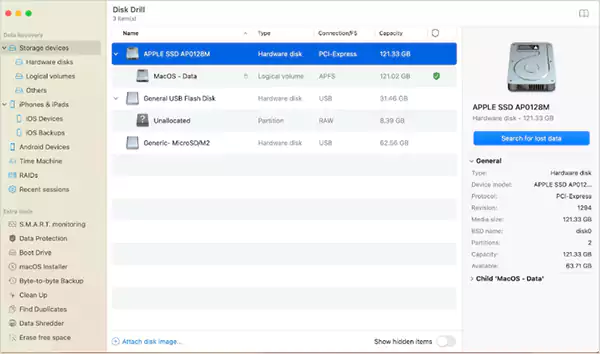
- Now, grant Full Disk Access so the program can reach the places where deleted files were stored.
- Next, choose the drive and search for lost data to start the scan.
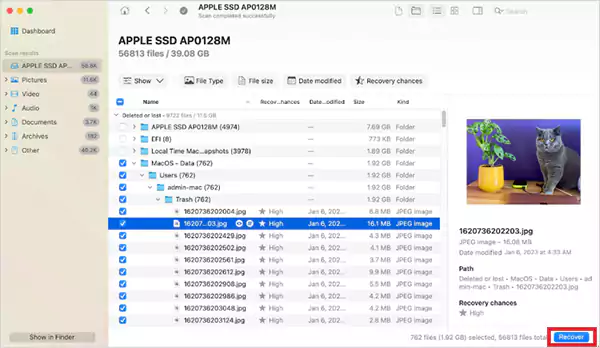
- The tool will now list recoverable photos, documents, videos, and other formats.
- Preview the files you want to check for integrity and select them. Some tools allow you to filter for type, size, or data to help you find the files quickly.
- Finally, just choose the Recover option and restore all items to another drive or external disk. This prevents overwriting the file you want to restore.
Recommended Data Recovery Software
- Disk Drill: It is one of the most reliable recovery tools for macOS. It supports APFS, HFS+, external drives, memory cards, and even iPhones, and can restore many file types with deep scan technology. Disk Drill also allows you to recover up to 500 MB for free.
- EaseUS Data Recovery Wizard: EaseUS is another great Mac and iPhone data recovery tool to restore files. It has a simple and beginner-friendly interface. It can work on formatted drives, supports Time Machine backups, and allows free recovery up to 2 GB.
- PhotoRec (Free and Open-Source): A command-line tool that can be a great free option for advanced users. It is not that easy, but it can still retrieve files if you understand how to navigate disk structures.
Recover Emptied Trash From Mac: What Works Best in Different Scenarios?
Different recovery methods work better depending on the device and whether you have a backup. So, if you are confused about multiple options to recover items from the emptied Trash on Mac, here’s a clear breakdown to help you choose the right approach.
- Scenario A: You have a backup
This is the safest situation for anyone. Time Machine, iCloud, or other cloud sync tools will easily restore your files with almost no risk.
- Scenario B: No backup and using an older HDD Mac
Act quickly and use the recovery software of your choice. HDDs retain deleted data longer, so the chances of recovery are high.
- Scenario C: No backup and using a modern SSD Mac
Recovery is possible but less predictable because the new models that come with TRIM wipe deleted blocks faster. Your chances drop every minute you continue using the computer, so start scanning immediately.
How to Protect Your Mac From Permanent Data Loss?
Accidents; deletion of Trash data on Mac hurts when there is no safety net. The good news is that most data loss is preventable with a few simple habits. Here are a few tips that you should follow for long-term protection:
- Turn on Time Machine for your important files. It automatically creates hourly and daily snapshots. If a file goes missing, you can roll back to an earlier version within seconds.
- Immediately stop using the device and start the recovery process after accidental deletion. The less data you write, the higher the chances of recovery.
- Run Disk Utility’s First Aid regularly on your Mac to keep your drives healthy.
- Use iCloud or another cloud solution to keep extra versions of your important files online.
- Try to understand your recovery tools better. Familiarity with them can help you act quickly if something goes wrong.
A blend of smart backups, cloud syncing, healthy storage habits, and quick response can protect your device for years, including MacBooks and Windows.
Final Thoughts
macOS gives you several reliable options to restore lost data. Otherwise, recovery software like Disk Drill and Phone Rec can help you when no backup exists.
I hope that you now understand how to recover emptied trash on Mac. The key is understanding how deleted files behave, acting quickly, avoiding new writes, and knowing the right method for your situation.
Frequently Asked Questions
Does emptying the Trash on Mac permanently delete files?
Where does empty Trash go on a Mac?
Your system marks the space as available for new data and hides the deleted file. However, you can retrieve such files if you don’t overwrite the space.
Are Trash and Bin the same in Mac?
Yes, both are the same thing on macOS, which is to store the recently deleted files. It depends on the region and language settings of your device. For example, if you use English UK, it is going to be labelled as Trash.
How to recover permanently deleted files in Mac?
If you have a backup, try recovering from Time Machine, iCloud, or Terminal. If you don’t have a backup, stop using the device after deletion for any new activity and just try to recover it using third-party tools, like Disk Drill and PhoneRec.
What does TRIM do on SSD?
TRIM is a command used in SSDs that informs the drive which data blocks are not needed after files are deleted. This is done to increase the efficiency of the drive and improve the data writing performance.

Related Posts

How to Check for Malware on Mac in 2026?
Can Mac computers get viruses? Macs are not as safe as people think. Yes, macOS has built-in tools like XProtect…
10 Best Lightroom Preset Alternatives in 2026
“Photography is the story I fail to put into words.” — Destin Sparks (Landscape Photographer) For years, Lightroom presets have…
Elementor Hosting vs SiteGround: Which is Faster in 2026?
A website’s performance is mainly determined by its Speed. Even a slight delay can reduce conversions by a significant margin.…
10 Best Visual UGC Platforms for eCommerce Brands in 2026
“People influence people. Nothing influences people more than a recommendation from a trusted friend.” — Mark Zuckerberg (Meta CEO) That…

The Data Models Powering the Next Creative Revolution in Video Generation
Artificial intelligence has evolved from a mere tool to the cornerstone of advancements in the new era. Over the years,…
Solar Software Companies: How Platforms Improve Cross Team Collaboration
“If everyone is moving forward together, then success takes care of itself.” — Henry Ford (Industrialist & Business Magnate) Handoffs…

What Healthcare Leaders Expect From Digital Tools
Healthcare executives are under pressure to protect patient safety, clinician time, and data privacy while modernizing the delivery of care.…

How to Reset Android Phone When Locked? (Safe Factory Reset Methods)
Locked out of your Android phone or stuck on the screen? It happens more than you think. A forgotten PIN,…
How to Transfer Contacts from Android to iPhone: 4 Easy Methods
Switching from Android to iPhone should not feel like rebuilding your life from scratch. Restoring contacts on iPhone should be…