If yes, then Mac Recovery Mode should be your built-in rescue tool.
I consider it an emergency toolkit for my MacBook. It can help you repair, reinstall, restore, and reset all kinds of systems without any recovery software for Mac. When I first used the recovery mode on Mac, it was not very easy. But once I figured it out, I understood its true power.
I am here to share secrets and explain how to boot a Mac into recovery mode, how to use it effectively, and how simple it can be once you know where to start.
Quick Glance (If You’re in a Hurry)
Press and hold the power button to enter the recovery mode on Apple Silicon Macs.
Press and hold the Command + R keys to start the recovery mode on Intel-based Macs.
Key recovery options include Disk Utility, Reinstall macOS, Time Machine Restore, Web Browser, and Terminal.
Always back up your data before using the recovery mode on Macs to avoid accidental data loss during troubleshooting.
What is Mac Recovery Mode?
As the name suggests, Mac Recovery Mode is the built-in data recovery tool. It helps you fix problems, reinstall macOS, restore backups, and keep your data safe (even when your system is not working properly).
Whether your Mac is acting weird, the disk shows errors, or you just want to reinstall the OS from scratch, Recovery mode options have you covered.
The process, tools, and utility apps available on recovery mode depend on your Mac type, like Apple Silicon (newer versions having M1, M2, M3, or M4 chips) or Intel-based.
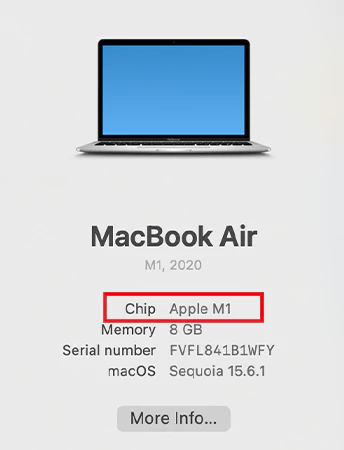
Is Your Mac Apple Silicon or Intel?
To know which Mac you have, just click on Apple Menu > About this Mac. If you see ‘Chip’, you are on Apple Silicon. If it says ‘Processor(Intel)’, you are using an Intel-based Mac.
How to Start Mac in Recovery Mode on Apple Silicon Macs?
If your Mac runs on an M-series chip, like M1, M2, M3, or M4, here is how to start your MacBook in recovery mode:
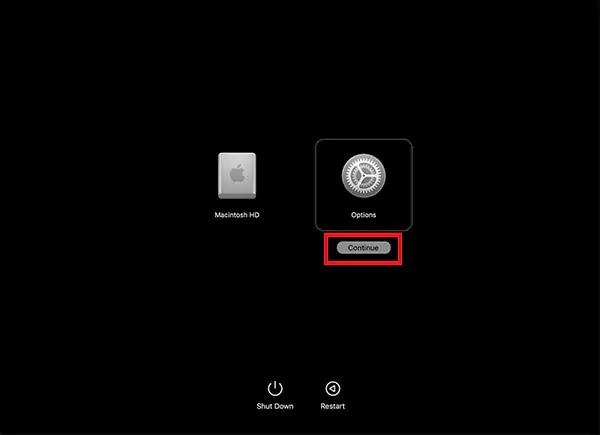
Shut down your Mac completely. If it is frozen, press and hold the power or Touch ID button for about 10 seconds until it turns off.
Now, press and hold the power button again until you see ‘Loading startup options.’
Here, click on Options and select Continue.
Select your startup disk (Macintosh HD) and, if prompted, choose a user and enter their password.
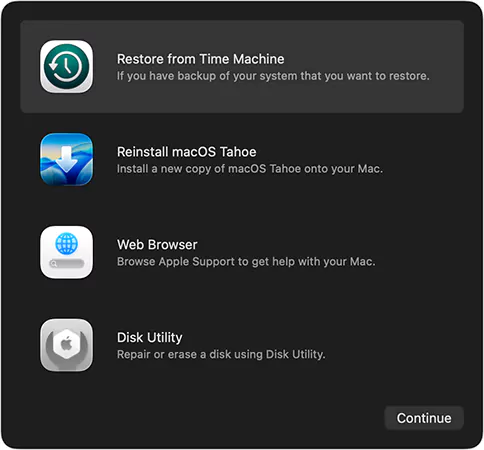
Once you enter the recovery mode, you will see options like Restore from Time Machine, Reinstall macOS, Disk Utility, and advanced tools like Terminal in the menu bar. So, get ready to troubleshoot, restore, or reinstall.
How to Run Mac in Recovery Mode on Intel-Based Macs?
Now, if you are using an older Intel-based Mac, the method for booting the MacBook into recovery mode is slightly different. Just follow these steps:
Turn off your device completely. If it is not responding, try holding the power button for 10 seconds to force the shutdown.
Turn it back on, then immediately press and hold Command + R until you see the Apple logo or spinning globe.
If asked, connect to Wi-Fi or plug in an Ethernet cable.
Next, choose your startup disk (Macintosh HD), and if prompted, enter your admin password.
Now, you will be able to see different recovery mode options.
In Intel Macs, you can also use the Option + Command + R shortcut to upgrade to the newest compatible macOS via the internet. And, using Option + Shift + Command + R reinstalls the original macOS that came with your Mac (or the closest available version).
What Utilities and Tools are Available in Mac Recovery Mode?
But what can you do in Mac Recovery Mode? When your Mac boots into recovery mode, it opens a special window of macOS utilities. It is like a control panel for fixing, restoring, or reinstalling macOS.
Here’s what you can do inside the Mode Recovery Mac:
Restore from Time Machine Backup
If you have been backing up your Mac with Time Machine, this option helps you roll back your system to a previous and stable version. This is ideal for fixing major software issues or accidental changes.
Reinstall macOS
Reinstalling macOS can fix deep software issues or performance slowdowns. Just select Reinstall macOS, click on Continue, and follow the prompts. Make sure you are connected to the internet and have a stable power source.
Run Disk Utility to Repair Storage
Disk Utility is my go-to tool for fixing drive-related problems on Mac. It allows you to verify, repair, or erase disks using the First Aid function. If you see errors that cannot be fixed, your drive may have hardware damage. In that case, it is better not to force repairs in recovery mode.
Use Terminal
The Terminal tool on Mac devices allows advanced users to run system commands directly. While it is powerful, it also comes with risk. One wrong command can cause data loss. I would recommend that you always double-check the command before proceeding.
Get Online Support
You can access Safari when you restart your Mac in recovery mode. You can access Apple’s official support pages and troubleshooting guides. It is a simplified browser, which is fast enough to search for solutions when your Mac is not working normally.
These are just a few of the many options available in the recovery mode. These tools are especially helpful for troubleshooting, data recovery, or system maintenance without requiring full macOS access.
When Should You Use macOS Recovery Mode?
I have already mentioned that the macOS or MacBook Recovery Mode is like a built-in rescue center. Let me simplify why and when you should use it:
To wipe your Mac before selling or giving it away. It helps in safely erasing your data and signing out of your Apple ID.
If your Mac won’t boot or keeps freezing, the recovery mode can help you fix startup or performance issues.
To restore your system to a point when everything was running smoothly, use a Time Machine backup.
If you need to perform a clean installation to fix deep software glitches or a corrupted system.
To recover lost files or partitions from damaged or missing drives.
You can also use it to set or reset firmware passwords. This helps secure your Mac from unauthorized use and adjust startup security settings.
In short, when things go wrong, the first thing you should do is try accessing the recovery mode.
How to Quit Mac Recovery Mode?
In most cases, your Mac will restart automatically after reinstalling macOS or restoring from Time Machine. If not, here’s how you can exit the recovery mode manually:
Click on the AppleMenu in the top-left corner.
Now, just choose Restart to return to normal mode.
If you want to boot from another disk, you can also restart the device by going to Apple Menu > Startup Disk > Select Disk > Restart.
If you want to shut down instead of restarting the device, just select the Shut Down option from the Apple Menu.
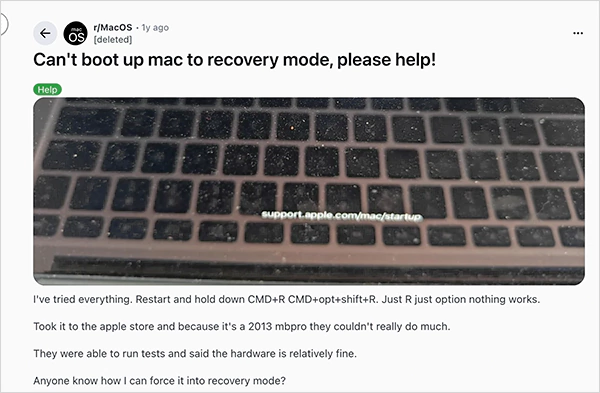
When You Can’t Boot Mac in Recovery Mode?
There were a lot of queries on online forums about Mac Recovery Mode not working. So, let me tell you the best possible fixes to try if your Mac does not start in recovery mode:
Restart and try again: Sometimes it is just a timing issue. So, restart your device and hold Command + R right after pressing the power button. If you press too late, your Mac might skip the recovery mode and boot normally.
Try recovery over the internet: If local recovery is not working for you, try using the internet recovery methods. Just hold Option + Command + R or Shift + Option + Command + R while restarting. This forces your Mac to download recovery tools directly from Apple’s servers.
Check your keyboard: If your keyboard is not responding, your Mac won’t detect the key combo. Using an external keyboard may help you in this case.
Reset NVRAM: Software glitches or updates can also block your access to the macOS recovery mode. To fix this, restart your device and hold Command + Option + P + R for 20 seconds. This resets NVRAM, which often resolves startup conflicts on Mac.
I am a firm believer in taking precautions before any troubleshooting. So, before diving into the recovery mode, go through these tips to avoid data loss and unexpected interruptions:
Always back up your data before reinstalling macOS or restoring from a Time Machine backup. This ensures you do not lose important files if something goes wrong.
You may need your Apple ID, password, and other details, so keep them ready before you start.
Always check your drive by using Disk Utility > First Aid before reinstalling macOS.
If you are using a MacBook, connect it to a power source during the process. A sudden shutdown can corrupt system files.
If your Mac feels slow or buggy, try Safe Mode first by holding the Shift key while booting. It often resolves small software issues without even accessing the recovery mode.
Recovery mode on Mac is an incredibly powerful built-in tool, and when used right, it can bring your Mac back to life without visiting a repair center. With little care and the tips provided in this guide, you will be able to handle Mac Recovery Mode confidently.
However, if your issue involves physical damage or severe data corruption, you may need professional data recovery help. And remember, always keep a fresh backup of important data on an external drive or cloud platform.
Yes, you can easily reinstall macOS in recovery mode. Just make sure you are connected to the internet.
How do I boot my Mac into recovery mode?
Turn off your Mac, and then turn it on again. On Mac with Apple Silicon, continue holding the power button until you see ‘Loading startup options.’ On a Mac with an Intel processor, press and hold the Command + R keys until you see the Apple logo or spinning globe.
Does recovery mode delete everything on a Mac?
If you are just booting into the recovery mode, your data will be intact. However, if you decide to troubleshoot by reinstalling the OS or erasing a disk, your data will be deleted.
Why won’t my Mac enter recovery mode?
It may happen when your keyboard does not respond, the timing of pressing the keys is off, or when the software glitches block access to macOS recovery mode.
What is Mac Internet Recovery?
When the local recovery is not available on your Mac, the internet recovery allows you to reinstall the OS directly from Apple’s servers using an internet connection.