No, it is only available on macOS El Capitan (10.11) or later. Older Mac versions do not support Split View.
How to Split Screen on Mac (Easy macOS Guide)
Updated on: Apr 15, 2026
Do you know how to do a split screen on Mac devices? If not, this guide is for you.
Switching between multiple tabs quietly kills your focus. One second you are writing, the next you are hunting for a reference or checking a spreadsheet. That’s where a split view actually changes how you work.
macOS already includes the feature on devices running El Capitan 10.11 or later, but most people do not use it effectively. So, I will explain how to split screen on Mac properly, tweak it to your style, and fix issues that slow you down.
Quick Answer: How to Do Split Screen on Mac?
- Open your first app.
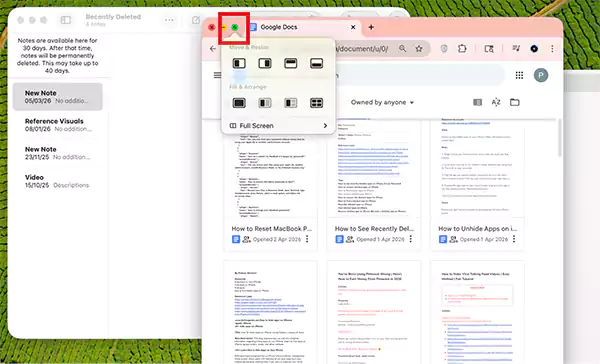
- Hover over the green button on top-left.
- Choose Full Screen.
- Select between Left of Screen and Right of Screen.
- Choose your second app.
Split Screen on Mac: A Quick Overview
Split screen for MacBook or Macs is powered by a feature called Split View. It allows you to run two apps side by side in full-screen mode, so you don’t have to keep jumping between tabs.
You get two focus workspaces on one screen. One for your main task, and one for support. For example, you use it for writing while checking research, watching a lecture while taking notes, or comparing two documents.
I even used it while writing this guide. It saves your time, improves focus, and makes multitasking practical. Everything you need stays visible and in control. So, how do you do a split screen on Macs? Let’s find out in the next section.
How to Split Screen on Mac (Step-by-Step)?
This method works on almost every modern Mac. Here’s how to have a split screen on a Mac:
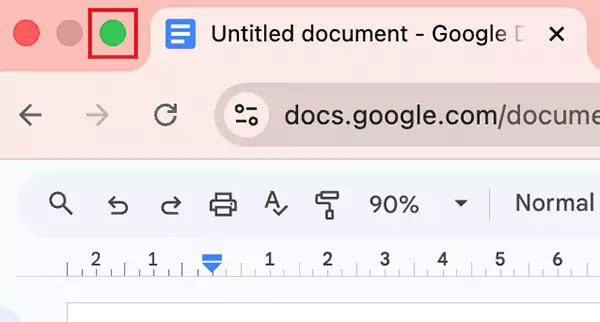
- Open your first app window; the one you want to anchor your workspace with.
- Now, move your cursor to the green button (top-left). Just hover over the green button, don’t click it directly.
- Then choose Full Screen and select between Left of Screen or Right of Screen.
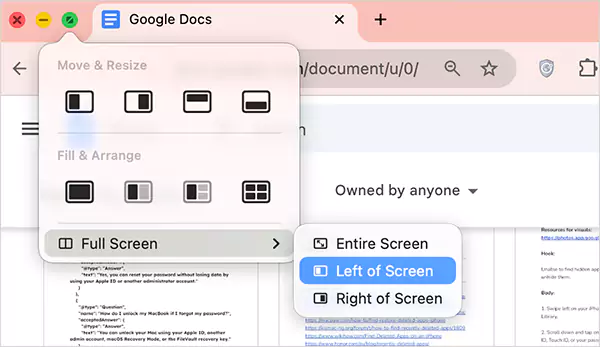
- Next, your Mac will show other open Windows. Just click on the one you want to use.
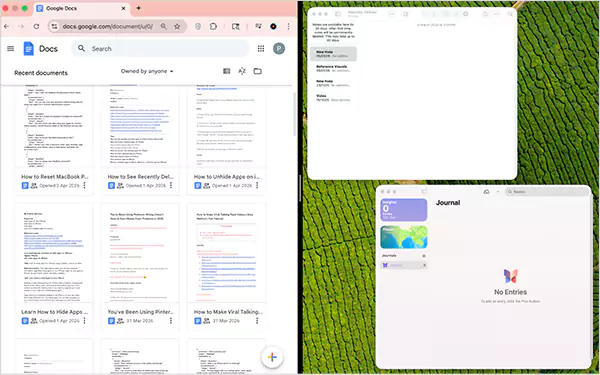
- You will see both the windows side-by-side in full-screen.
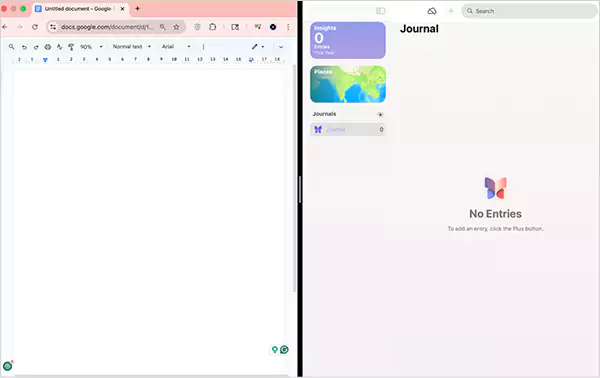
That’s how easy it is to enter a Mac or MacBook split screen. The first app decides the position, and the second app fills the remaining space.
How to Adjust, Resize, or Use Split View?
Learning how to split the screen in macOS is one thing. But you should be able to control and use it to your advantage. Here’s how to split screens on Mac effectively:
- Show or Hide Controls: Move your cursor to the top of the screen to reveal the menu bar and move away to hide it. Do the same near the bottom to show or hide the Dock.
- Resize Apps: Drag the divider in the middle to give more space to one app. If you want to reset it, just double-click the divider.
- Switch Sides: Just drag a window across to the other side.
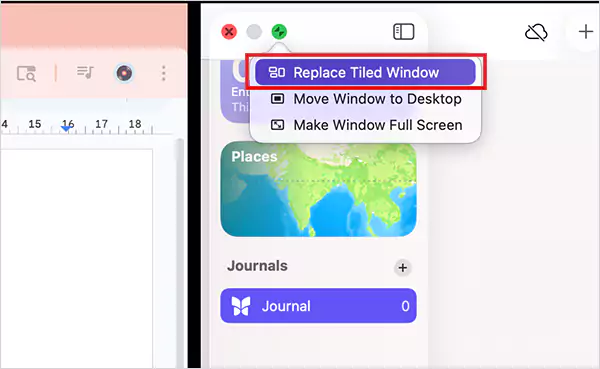
- Replace an App: Click inside the app you want to replace, hover over the green button, choose Replace Tiled Window, and pick another app.
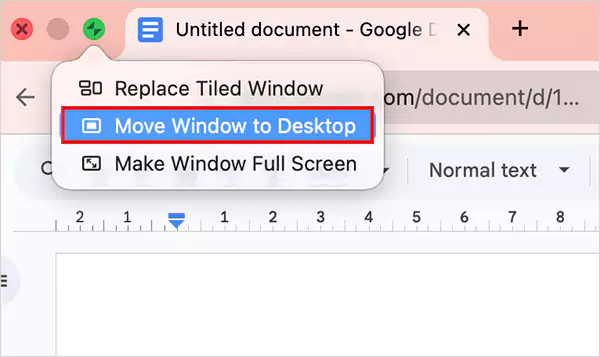
- Move an App Back to Desktop: Click the app, hover on the green button, and select Move Window to Desktop. The other app will stay in full screen in its own space.
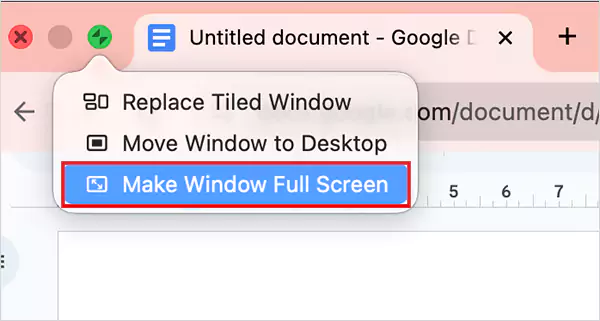
- Make One App Full Screen: Do the same steps as mentioned above and choose Make Window Full Screen.
- Access Apps After Changes: Press Control + Up arrow or swipe up with three or four fingers to open Mission Control. From there, you can switch between spaces and apps easily.
The real power of split screen with Mac is in how quickly you can adjust, swap, and control apps without breaking your flow.
How to Exit Split Screen on Mac?
Getting out of Split View is easy once you know the logic. Here are two easy methods to exit:
Method 1: Use the Green Button
- Move the cursor to the top.
- Then, click the green button on any app.
- That app exits the split view, and the other app may stay in full screen.
Method 2: Exit Both Apps Together Using Mission Control
- Press Control + Up arrow.
- Find the split view space at the top.
- Click on the expand icon to exit.

Both apps will now return to your normal desktop. It does not close any app; it just disables the split view.
Why is Split Screen Not Working on Mac?
Most of the time, this happens due to small settings or limitations. Let’s understand the reason and learn how to split screen on MacBooks in these situations:
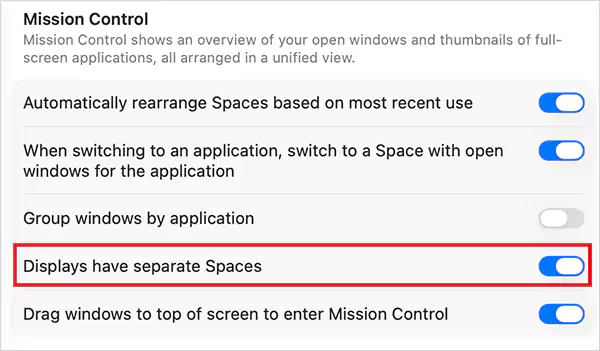
- “Display Have Separate Spaces” is Off: Go to System Settings > Desktop & Dock> Mission Control > Turn on “Display have separate Spaces”. Without this, split view won’t work.
- App Does Not Support Split View: Some apps simply don’t allow it. If you see “not available”, you cannot do it.
- App is Already in Full Screen: You cannot split the screen in full screen mode. So, bring it back to normal first, and then try.
- macOS is Outdated: Older versions of macOS can cause issues. Just update your system and try again.
- Temporary Glitch: A simple fix is to restart your Mac. It can solve more issues than people expect.
Most issues are not technical. They come down to one setting or one incompatible app. And you can easily fix that.
Final Thoughts
Now that you know how to split screen on Macs properly, it changes how you work. You don’t need to switch tabs constantly and break your flow.
But using the split view is just step one. Managing it well is where the real value is. That’s what turns it from a feature into a system. So, if you use a Mac daily, this should not be optional for you.
Frequently Asked Questions
Is split screen available on all Macs?
How to open two windows side by side on Mac devices?
Hover over the green button on any app, choose left or right, and then select the second app. It takes less than 5 seconds once you get used to it.
What is the difference between split screen and window tiling on Mac?
Split screen puts two apps in full screen and creates a separate workspace. Window tiling keeps apps in a normal desktop view.
Can I use split screen with more than two apps on a Mac?
No, split view only supports two apps at a time. For more, you can tile your app windows on the desktop.
Why can’t I see the split screen option on my Mac?
Either the app does not support it, or the “Displays have separate Spaces” setting is turned off.

Related Posts

8 Best AI Presentation Makers for Business-Ready Slides
Making a presentation doesn’t just mean designing slides. It’s about defining a clear structure, using defined logic, useful visuals, and…

Queue Management Software Troubleshooting Guide: 8 Common Faults and Fixes
The long wait times and ineffective management of customer queues can have a significant impact on customer satisfaction and business…

How to Use Similarweb Website Traffic Data for Competitor Research
Competitor research without traffic data is guesswork. You can guess who your rivals are, guess how big they are, guess…

Choosing the Right Hosting Model for Scalable Digital Platforms
The performance of digital business is directly related to website speed, uptime, and scalability. Slow page performance has a negative…

How Data-Driven Performance Tools Are Transforming Employee Recognition in Tech Companies
“People work for money but go the extra mile for recognition, praise, and rewards.” — Dale Carnegie (Writer & Teacher)…

Why Businesses Struggle to Collect Reliable Data from the Web
Almost every company that depends on data runs into the same problem: although they can find the data they need,…

Why Financial Data Recovery Matters for Businesses
Financial data supports every part of a business, directly affecting cash flow, payroll, tax reports, audits, customer billing, and daily…

CMMC Compliance Is Coming for Manufacturers. Here Is What You Need to Do
“Cybersecurity is much more than a matter of IT.” — Stephane Nappo (Cybersecurity Professional) For manufacturers working within the defense…

How Data-Based Tools Influence Learning Performance
Learning has transformed in the modern age with the integration of new technologies to help students and professionals prosper in…