There are several ways to capture your screen on Win 10. You can use the Snip & Sketch tool, Print Screen key, Xbox Game Bar, or any third–party tools for advanced features.
How to Take A Screenshot on Windows 10 and Record Your Screen?
Updated on: Jun 16, 2025
Table of Contents
- How to Take a Screenshot on Windows 10 Using Print Screen?
- How to Screenshot on Windows 10 with Snip & Sketch?
- How to Screen Capture Windows 10 using the Snipping Tool?
- How to Take a Screenshot Using Windows 10 Game Bar?
- How to Take a Screenshot in Windows 10 Microsoft Surface?
- How to Record My Screen on Windows 10?
- Third-Party Tools to Capture Your Windows Screen
- Wrapping Up
- Frequently Asked Questions
Screenshots have become a part of everyday life, whether you are reporting an issue, saving an invoice, or sharing your screen. On another note, Windows 10 is the most popular Windows desktop operating system with 54% of market share as of March 2025.
Thus, it is common for users to ask how to take a screenshot on Windows 10. There are several easy ways to do this on Windows 10, similar to taking a screenshot on Windows 11.
From quick keyboard shortcuts to built-in tools, I will walk you through all the different methods to capture your screen, including how to screen record on Windows 10.
How to Take a Screenshot on Windows 10 Using Print Screen?
A lot of people ask me online – How do I screenshot on Windows 10 using keyboard shortcuts? Well, the easiest way of taking a screenshot on Dell, HP, or any other brand using Windows 10 is with the Print Screen key.
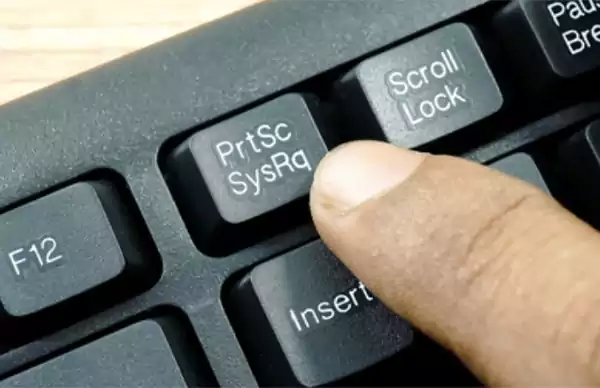
The PrtScn is usually found in the top-right corner of your keyboard. Here’s how you can use it to capture the screen:
- Full Screen: Press Windows + PrtScn to capture the whole screen. This screenshot will be saved automatically in the Pictures > Screenshots folder.
- Copy all active windows to the clipboard: Just press the PrtScn key.
- Copy only the active windows: Press Alt + PrtScn hotkeys.
If the screenshot goes to the clipboard (not saved automatically), you can open an app like Paint or Photoshop, press Ctrl + V to paste it, and then save it as needed.
How to Screenshot on Windows 10 with Snip & Sketch?
Snip & Sketch is a handy tool on Windows 10 that allows you to easily take screenshots, edit them, and share them. Let’s see how to take a screenshot in Windows 10 using this tool.
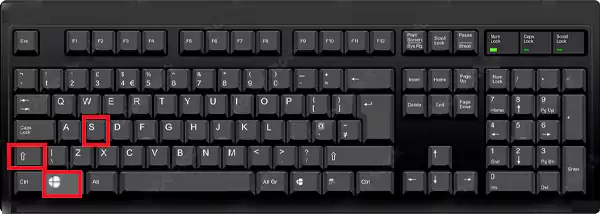
1. To open it quickly, press Windows + Shift + S on your keyboard.
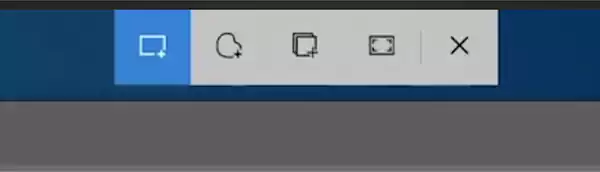
2. Your screen will dim slightly, and a small toolbar will pop up at the top, giving you four screenshot options:
- Rectangular: Drag to select a rectangle.
- Freeform: Draw any shape with your mouse.
- Window: To capture a specific window.
- Full Screen: To capture the entire screen.
3. Once you take a screenshot, it gets copied to your clipboard, and a preview appears in the bottom right corner.

You can click that preview to open Snip & Sketch. Here you can draw, crop, erase, and then save or share your final image.
How to Screen Capture Windows 10 using the Snipping Tool?
How do you take a screenshot on Windows 10 Snipping Tool? Well, it is an old but handy feature in Windows. Though it is not in the Start menu anymore, you can still find it using the search bar and open it from there.
Once the tool is open, you will see a few options to capture your Windows screen:
- Mode: You can choose how you want to capture your screen, freeform, rectangle, a specific window, or the full screen. These options are similar to the features of the Snip & Sketch tool.
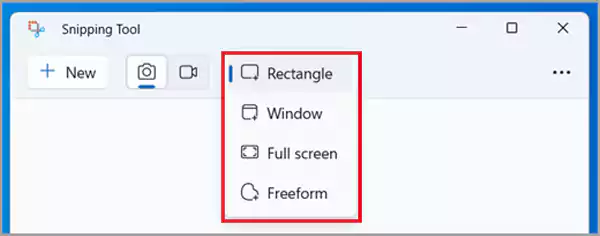
- Delay: If required, you can set a time of 1 to 5 seconds to capture something after a short wait.

Furthermore, you also get options to adjust some basic settings. To take a screenshot:
1. Click on New, and your screen will dim slightly.
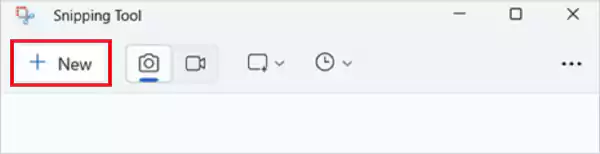
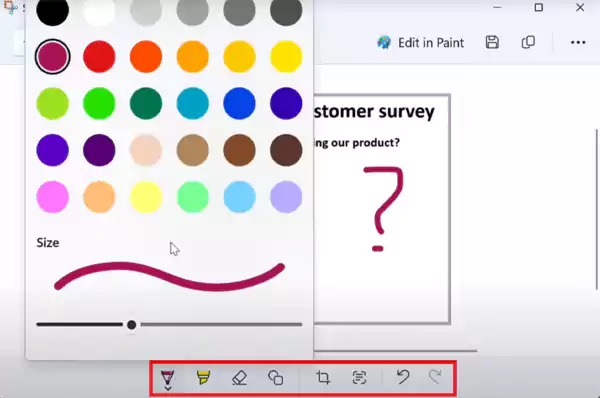
2. Select the area you want to capture, and the image will open in the tool. Now, you can annotate, edit, save, or share it with anyone.
Just remember, it won’t be saved automatically. You need to click on File > Save As to keep it.
How to Take a Screenshot Using Windows 10 Game Bar?
Another great way to learn how to take screenshots on Windows 10 is by using the Xbox Game Bar. It allows you to take screenshots or record your screen while using most apps and games. Here’s how to use it:
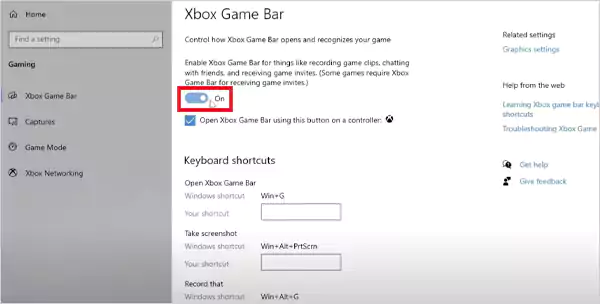
1. Press Windows + G on your keyboard. If nothing pops up on your screen, go to Settings > Gaming > Xbox Game Bar and make sure it is turned on.
2. Once the Game Bar appears, click on the camera icon to open the capture menu.
3. In the Capture menu, click on the camera to take a screenshot.
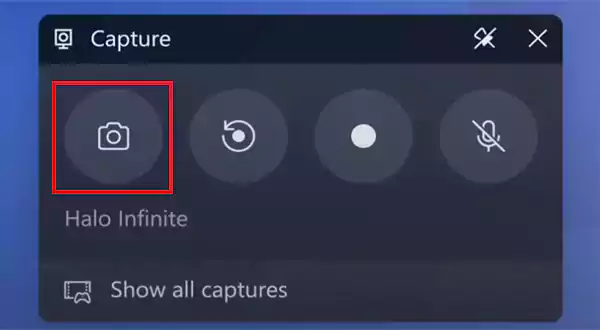
But where are these screenshots saved in Windows? All your screenshots taken by the Game Bar are saved automatically in the Videos > Capture folder. You can also view them in the Game Bar by selecting the ‘See my capture’ option.
How to Take a Screenshot in Windows 10 Microsoft Surface?
Many people also use Windows with a Microsoft Surface. It is a bit different to capture your screen on a tablet. So, let’s see how to take a screenshot in Win 10 Microsoft Surface tablet:
- For most Surface models: Press the Power button and Volume Up at the same time.

- For Surface 3 or older: Press the Windows logo and Volume Down button together.
The screenshot will be saved automatically in the Pictures > Screenshots folder. If you are using a Surface without a keyboard, this button method is your best option.
Plus, if you have a Surface Pen, you can just double-click its back button to open the Snipping Tool for more control.
How to Record My Screen on Windows 10?
Now that you know all about screenshots, learning how to screen record on Windows 10 can also come in handy in many situations. You can do it without installing any extra software.
Use Xbox Game Bar
It is the simplest method to record the screen on your device. Press Windows + G on your keyboard to open the bar. Click the record button or use Windows + Alt + R to start recording.
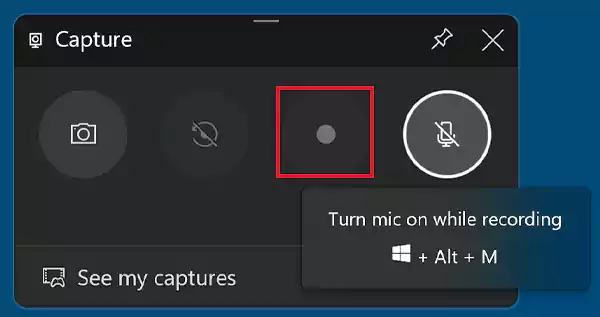
You can press the same shortcut again to stop, and your recording will automatically be saved in the Videos> Capture folder.
Use the Snipping Tool
The newer version of Snipping Tool now comes with screen recording features. Once you open the tool, click on the camera icon to switch to video mode. Then click on ‘+New’ to select the area you want to record.
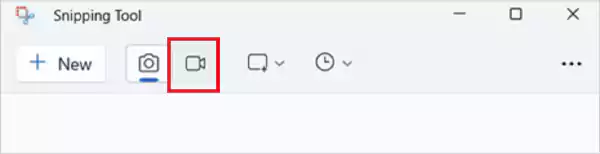
After selecting, click Start to begin recording and Stop to finish. You can save the file anywhere on your device as per your preference.

If you need more advanced features, there are several third-party tools available for screen recording. You can try tools like OBS Studio, Clipchamp, Microsoft Stream, and more.
Third-Party Tools to Capture Your Windows Screen
If the built-in screenshot options on Windows 10 are not enough for you, there are several third-party apps that offer more flexibility and features. Here are some of the popular options:
- Lightshot is a lightweight and free tool that can help you. It is perfect for quick edits and easy sharing on social media.
- Greenshot allows you to take scrolling screenshots on a desktop (like full web pages) and gives you plenty of editing options for free.
- Snagit is a premium tool packed with features like full-page capture, GIF creation, and detailed editing.
Other popular options include ShareX, Doplr, and ScreenRec, which offer many useful and advanced features.
Wrapping Up
Windows 10 gives you plenty of easy ways to take screenshots. Whether you use the Snipping Tool, keyboard shortcuts, or the Game Bar, every option is quick and easy.
I have tried to cover everything to explain how to take a screenshot on Windows 10 without any hassle. Now, it is up to you to pick the one that works best for you.
Frequently Asked Questions
How to screen capture in Windows 10?
What is the shortcut key for a screenshot in Windows 10?
Alt + Prt Scr, Windows + Prt Scr, and Windows + Shift + S are a few keyboard shortcuts to take a screenshot on Windows
How to take a screenshot on Windows 10 without PrtScn?
You can try using Fn + Windows + Space bar to take a screenshot. Some devices may support this keyboard shortcut.
Where can I find Screenshots on Windows?
Typically, you can access your screenshots in the Pictures > Screenshots folder. However, sometimes you may find it in your clipboard.

Related Posts

8 Best AI Presentation Makers for Business-Ready Slides
Making a presentation doesn’t just mean designing slides. It’s about defining a clear structure, using defined logic, useful visuals, and…

Queue Management Software Troubleshooting Guide: 8 Common Faults and Fixes
The long wait times and ineffective management of customer queues can have a significant impact on customer satisfaction and business…

How to Use Similarweb Website Traffic Data for Competitor Research
Competitor research without traffic data is guesswork. You can guess who your rivals are, guess how big they are, guess…

Choosing the Right Hosting Model for Scalable Digital Platforms
The performance of digital business is directly related to website speed, uptime, and scalability. Slow page performance has a negative…

How Data-Driven Performance Tools Are Transforming Employee Recognition in Tech Companies
“People work for money but go the extra mile for recognition, praise, and rewards.” — Dale Carnegie (Writer & Teacher)…

Why Businesses Struggle to Collect Reliable Data from the Web
Almost every company that depends on data runs into the same problem: although they can find the data they need,…

Why Financial Data Recovery Matters for Businesses
Financial data supports every part of a business, directly affecting cash flow, payroll, tax reports, audits, customer billing, and daily…

CMMC Compliance Is Coming for Manufacturers. Here Is What You Need to Do
“Cybersecurity is much more than a matter of IT.” — Stephane Nappo (Cybersecurity Professional) For manufacturers working within the defense…

How Data-Based Tools Influence Learning Performance
Learning has transformed in the modern age with the integration of new technologies to help students and professionals prosper in…