The easiest method to map drives is using File Explorer. Open This PC > Choose Map Network Drive > Assign a letter > Enter the folder path, and finish the setup.
How to Map Network Drives in Windows? Step-by-Step Tutorial
Table of Contents
Shared folders are useful until you have to search for the same network path every single day. That is where mapped network drives can assist you. Windows allows you to turn a shared folder into a regular drive that feels local and instantly accessible.
Learning how to map network drives saves time and makes file sharing more organized. So, if you work in an office, manage shared files, or simply want faster access to network storage, this tutorial is for you.
Key Takeaways
- Mapping a network drive turns a shared folder into a drive letter inside File Explorer.
- File Explorer is the easiest method to map drives in Windows. Command Prompt and PowerShell are better for automation and advanced management.
- Using File Explorer: Open This PC > Map Network Drive > choose a drive letter > enter the shared folder path > Finish.
- Using Command Prompt: Use net use Z: \\ServerName\SharedFolder /persistent to map a drive.
- Using PowerShell: Run New-PSDrive -Name “Z” -PSProvider FileSystem -Root “\\ServerName\SharedFolder” -Persist.
- Persistent mappings reconnect automatically after restarting Windows.
What Does Mapping a Network Drive Mean?
Before you learn how to map a drive, understand what it really is. Mapping a network drive means connecting a shared folder from another computer, server, or storage device to your Windows system and assigning it a drive letter.
Instead of opening long network paths every time, the shared folder appears inside File Explorer just like a local drive. For example, a shared folder located at “\\OfficeServer\Projects” can be mapped as “Z”.
Once connected, you can access it directly from this PC without manually entering the network location again. This is commonly used in offices, schools, and businesses where multiple users need access to the same shared files every day.
How to Map Network Drives in Windows?
Windows offers multiple ways to map a drive depending on how you prefer working. Most people rely on File Explorer because it is simple and visual.
IT teams and advanced users map network drives using command lines in Command Prompt or PowerShell for automation and faster deployment.
Before You Begin
- Make sure the shared folder is accessible on the network.
- You have permission to access it.
- You know the correct network path of the folder.
- Network discovery and file sharing are enabled if needed.
How to Map Network Drives in File Explorer?
This is the easiest method to understand how to map a network drive in Windows 10 and Windows 11:
- Press Windows + E to open File Explorer.
- Click on This PC from the left panel.
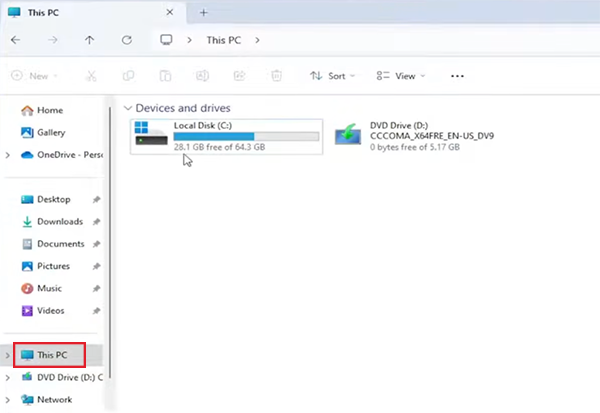
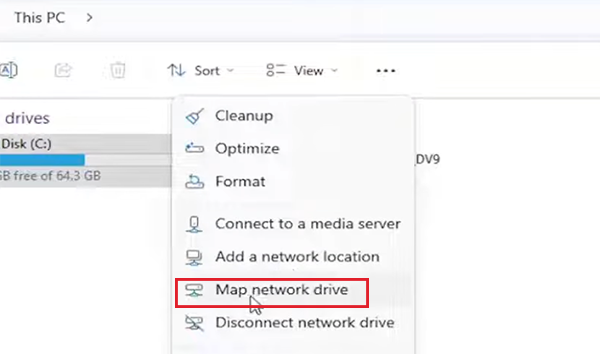
- Next, select Map Network Drive from the top menu. In Windows 11, you may find it under the three-dot menu.
- Now, choose an available drive letter.
- Enter the shared folder path. For example: \\ServerName\SharedFolder
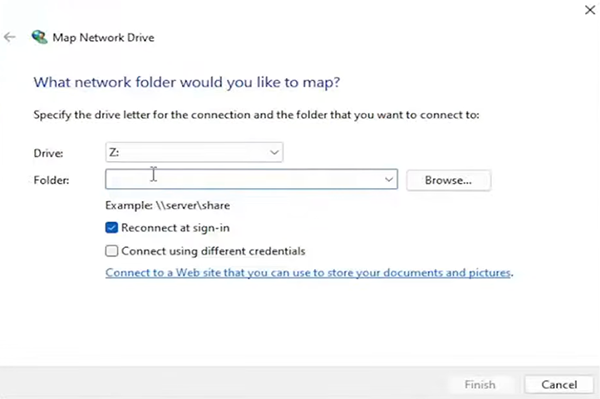
- Check the Reconnect at sign-in option if you want Windows to reconnect automatically after starting.

- Finally, click on Finish and enter the credentials if prompted.
Once completed, the mapped drive will appear alongside your local drives present inside File Explorer.
How to Map a Network Drive from Command Prompt?
If you frequently manage multiple systems or use scripts, the Command Prompt map network drive method is faster. Here’s how to map a network share using the command line:
- Open Command Prompt as an administrator.
- Then, run “net use Z: \\ServerName\SharedFolder /persistent:yes”. Replace “Z” with your preferred drive letter and “\ServerName\SharedFolder” with the actual network location.
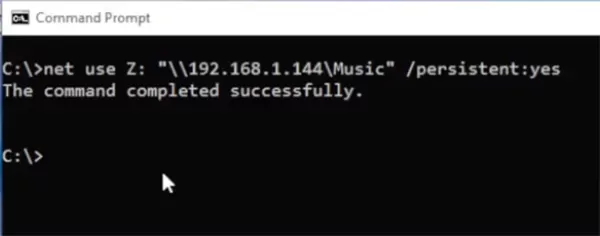
The \persistent parameter tells Windows to reconnect the drive automatically after sign-in. You can also use “net use” to view all mapped drives.
The net use Windows Command Prompt command remains one of the most reliable ways to manage mapped drives from the command line.
How to Map a Drive with PowerShell?
PowerShell is a useful map drive command-line option when you want more administrative control or automation.
- Open PowerShell on your system.
- Use this command:
New-PSDrive -Name “Z” -PSProvider FileSystem -Root “\\ServerName\SharedFolder” -Persist
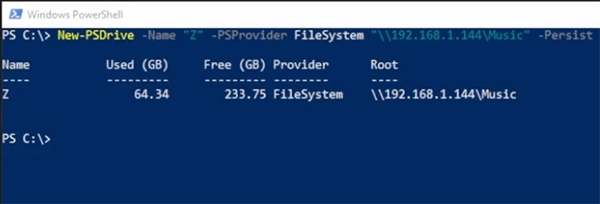
The -Persist command keeps the mapped drive available after restarting Windows. Temporary PowerShell drives only exist during the current session. Persistent mapping behaves like a traditional Windows network drive and also appears in File Explorer.
How to Remap a Network Drive?
Sometimes a mapped drive stops working because the server name changed, credentials expired, or the shared folder moved. It can also happen due to Windows caching an outdated connection.
In those situations, you need to remove the old mapping first and then reconnect it using the updated network path. Here’s how to do that:
- Open Command Prompt or PowerShell.
- Run: “net use Z: / delete”.
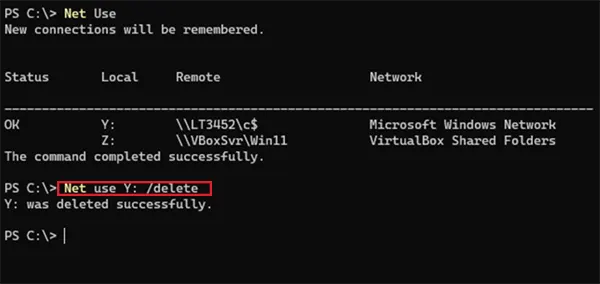
After removing the drive, repeat the process of adding a network drive using Windows 11 CMD or any other method with the correct location. If Windows keeps reconnecting to an outdated path, deleting the old mapping usually fixes the issue.
Why is Mapping a Drive Important?
Mapping a drive does much more than creating a shortcut. It helps users and organizations work faster by simplifying access to shared resources across a network. Here are some major advantages:
- It provides faster access to the shared folder across the network.
- It helps in organizing multiple systems and devices, and reduces errors that can happen when users manually enter long network paths.
- Collaboration between teams becomes easier by providing shared access to files. It ensures consistent file locations across different devices and user accounts.
- It simplifies centralized storage management and backup processes.
- Users get better compatibility with software that requires drive letters.
Mapped drives are especially useful in business environments where multiple users rely on the same files every day.
Common Errors While Mapping Drives and How to Fix Them
Even though mapping is usually simple, connection issues can still happen. Most errors are caused by incorrect paths, permission settings, or network-related issues. Let’s quickly cover the most common issues:
- Incorrect Network Path: Typos in the network path can prevent Windows from finding the shared folder. So, make sure that the server name is correct, the folder name matches exactly, and backslashes are entered properly.
- Access Denied Error: This happens when your account lacks permission to access the folder. Try using the correct username and password, verifying sharing permissions, and confirming that the network access is enabled. If required, contact the administrator.
- Drive Disconnects After Restart: Fix this by enabling the Reconnect at sign-in option and using “/persistent” and “-persist” command line.
In some situations, the drive connects successfully but does not appear in File Explorer immediately. In that case, you can try restarting the file Explorer, reconnecting the drive, and restarting the computer.
Additional Tips to Keep Network Drives Stable and Secure
A few simple habits can improve the reliability and security of mapped drives over time. Follow these tips for a smooth experience:
- Using the same drive letters across systems reduces confusion and makes documentation easier.
- Too many mapped drives can clutter File Explorer and slow sign-in times. So, only map folders that are regularly needed.
- Checking folder permissions periodically helps reduce security risks and prevents unauthorized access.
- Keep the shared folder organized because a clear folder structure improves collaboration and reduces the chances of misplacing a file.
- Protect shared network accounts with strong passwords and multi-factor authentication whenever possible.
- Removing old or unused mapping reduces unnecessary network traffic and keeps systems cleaner.
Also, shared storage should always be included in backup policies. Centralized data is convenient, but it also increases the importance of proper backups.
Final Thoughts
Mapping network drives is one of those small Windows features that quietly improve everyday productivity. You won’t need to search for shared folders or type long server paths. You get direct access from File Explorer just like a local drive.
The process to map network drives is simple when you have the correct permissions and network path. I hope you use any of the three methods mentioned above, as per your convenience and requirements, to create a faster and more organized way to manage network files.
Frequently Asked Questions
What is the easiest way to map network drives in Windows?
How do I map a network drive from Command Prompt?
Use the net use command with a drive letter and network path, such as: “net use Z: \\ServerName\SharedFolder /persistent”.
How do I map a network drive so it stays after a restart?
Enable the Reconnect at sign-in option in File Explorer, or use /persistent in the Command Prompt method.
Can I map a drive with different credentials?
Yes, Windows allows you to connect using different credentials during the mapping process. You have a dedicated option in the File Explorer method, and the net use command supports “/user”.
Why is my mapped drive not showing up in File Explorer?
This usually happens because of temporary refresh issues, permissions problems, or incorrect mapping settings.

Related Posts
What is an MKV File? Meaning, Uses, and How It Works
You can often identify a video file by its extension. MP4 is the most common, AVI is an older format,…
Symbolic Links in Windows: A Complete Guide to Creating Symlinks
Have you ever wished to keep a file or folder in one location while making Windows think it exists somewhere…
Data Recovery in 2026: How to Restore Lost Files From Phones, PCs, and Cloud…
Alt: Old Hard Disk Drives Nearly one-third of all data loss is caused by accidental deletion, hardware failure, or a…

How to Evaluate an SEO Agency’s GEO Capabilities Before Signing a Contract
Is SEO outdated? No, it has actually just changed or updated into other forms, such as GEO. The major question…

What Is an AAE File? Everything iPhone Users Need to Know
An AAE file is an Apple sidecar file that contains editing instructions, like crops and filters, applied to an iPhone…
What is an RPMSG File and How to Open It?
An RPMSG file usually appears when someone sends you a protected or encrypted email through Outlook. That is why the…
How to Make a Folder on Mac? Declutter your Home Screen
Is your Mac Desktop/Finder a mess of random files and screenshots? Don’t worry. You are at the right place because…
Error 640 Mac: How to Fix ZIP and Archive Expansion Problems
Seeing Error 640 Mac while opening a ZIP file? It can be confusing, especially when the file looks completely normal.…
How to Select Multiple Files on Mac Quickly? Step-by-Step Guide
Selecting multiple files on a Mac sounds simple, but most people still waste time clicking one file at a time.…