Ans. Connect an external drive, go to System > Settings > General > Time Machine, select the drive, and complete the setup. Time Machine will automatically back up your entire Mac.
How to Back Up MacBook with Time Machine? A Step-by-Step Guide
Table of Contents
- What is Time Machine on Mac?
- What You Need Before Setting Up Time Machine?
- How to Back Up MacBook Using Time Machine?
- How Time Machine Works After the First Backup?
- How to Restore Your Mac from a Time Machine Backup?
- Common Mac Time Machine Backup Problems and Quick Fixes
- Tips to Keep Your Time Machine Backup Useful
- Conclusion
- Frequently Asked Questions
We all have years of photos, documents, projects, passwords, and personal files on Mac. But a failed update, drive failure, issues like Mac Pink Screen, or accidental deletion can put all that data at risk in seconds.
That’s where Time Machine backup on Mac comes in. Built into every Mac, Apple’s backup tool automatically saves copies of your files in the background, making it much easier to recover data. Don’t worry, I am going to show you how to back up MacBook using Time Machine properly.
Key Takeaways: How to Use Time Machine on Mac?
- To set up Time Machine, connect an external drive to your Mac, add it as a backup disk, and complete the setup in Time Machine settings.
- After the initial backup, Time Machine only saves new or changed files, making future backups faster and more efficient.
- You can restore individual files, folders, or your entire Mac from a Time Machine backup on a Mac.
- Using a backup drive with sufficient free space and connecting it regularly helps keep your backups up to date.
What is Time Machine on Mac?
Apple Time Machine is a built-in backup software that comes free with every Mac. It automatically backs up your files, apps, photos, documents, settings, and other important data to a separate storage device.

What makes it different from simply copying files to an external drive is that it keeps multiple versions of your data. If you accidentally delete a file, overwrite a document, or run into a system problem, you can restore an older version with just a few clicks.
Time Machine is also one of the best data recovery software for Mac. Once set up, it works quietly in the background and automatically creates hourly, daily, and weekly backups. As long as your backup drive has space available, it continues maintaining your backup history automatically.
What You Need Before Setting Up Time Machine?
Before setting up Time Machine, you will need a backup destination. For most users, an external hard drive or SSD is the easiest option.
Apple recommends using a backup drive with at least twice the storage capacity of your Mac so future backups have enough room to grow. Before you begin, make sure:
- Your Mac is running on a recent version of macOS.
- Your backup drive has enough free storage.
- The drive is connected through USB, USB-C, or Thunderbolt.
- You are willing to connect the drive regularly for automatic backups.
If Time Machine detects a compatible drive, macOS may automatically ask if you want to use it for backups.
How to Back Up MacBook Using Time Machine?
Once you have all the things, setting up the Time Machine Mac backup only takes a few minutes. Here’s how to set up Time Machine on Mac
- Connect your external hard drive or SSD to your Mac.
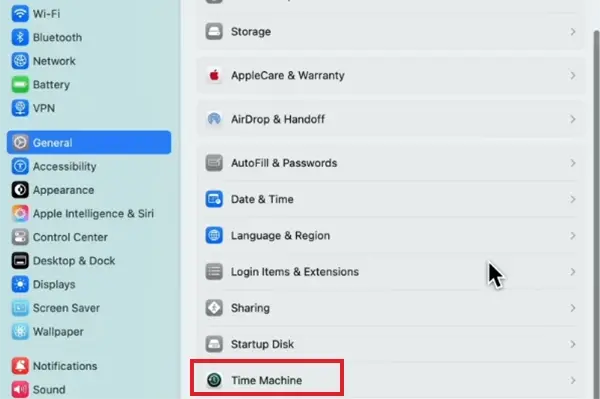
- Next, go to Apple Menu > System Settings > General > Time Machine.
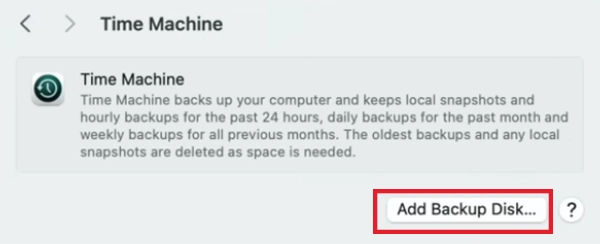
- Click on Add Backup Disk.
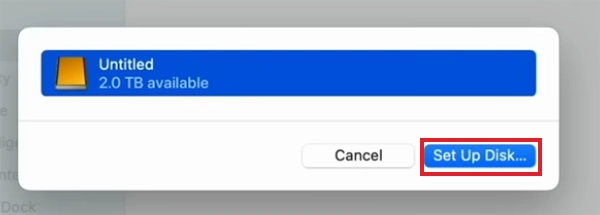
- Then select the drive you want to use, and click Set Up Disk.
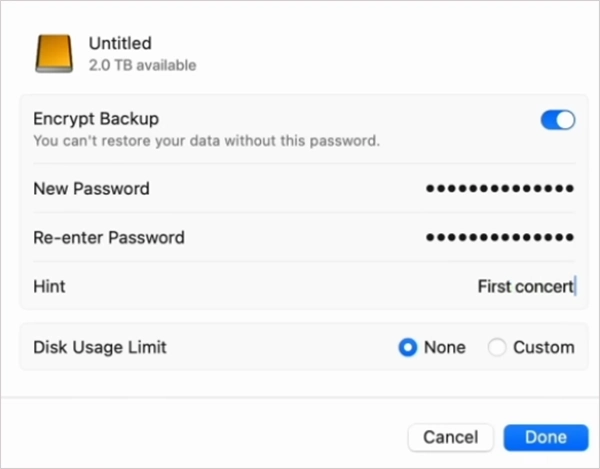
- Follow the on-screen instructions to enable backups. You can also encrypt your backup for extra security and exclude specific folders from backups if needed.
- Now just let the first backup finish. The first one usually takes the longest because Time Machine copies all the eligible data from your Mac.
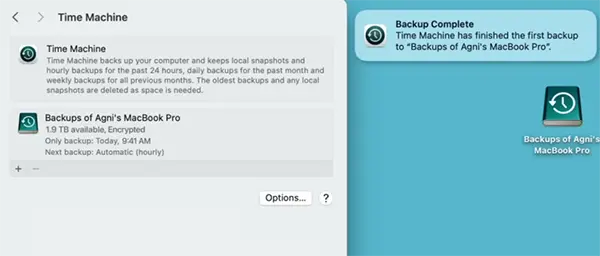
Future backups are much faster because only new or modified files are saved. Once the first backup is complete, it continues creating backups automatically in the background.
However, if you want to back up manually, you can also choose the Back Up Now option from the Time Machine Menu in the menu bar.
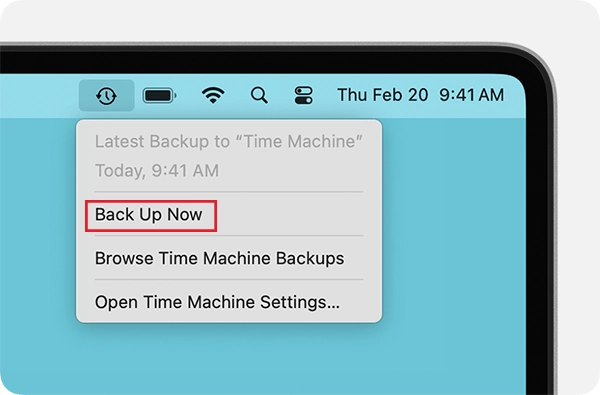
Now just let the first backup finish. The first one usually takes the longest because Time Machine copies all the eligible data from your Mac.
How Time Machine Works After the First Backup?
People often assume Time Machine creates a full backup every time. Well, that is not the case. After the initial backup, Time Machine only saves files that have changed since the previous backup. This approach reduces storage usage and speeds up future backups significantly.
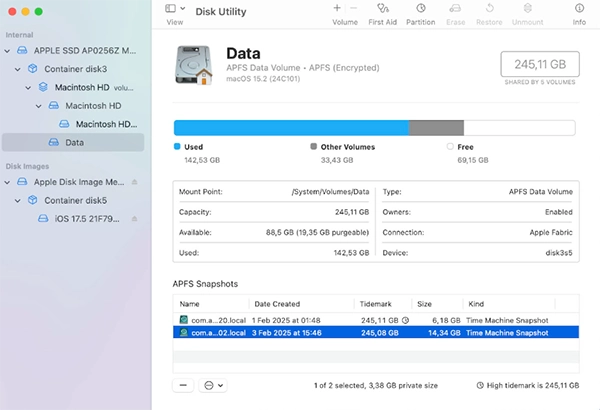
The system also manages backup history automatically. As storage fills up, older backups are removed to make room for newer ones. Another useful feature is local snapshots. If your backup drive is not connected, your supported Macs can temporarily save snapshots on the internal drive, giving you another way to recover recent changes.
How to Restore Your Mac from a Time Machine Backup?
Now you know how to back up MacBooks. But Time Machine is also designed to help you recover files quickly.
If you accidentally delete a file or need an older version of a document. Here’s how you can restore individual files:
- Open the folder where the file was originally stored.
- Click on the Time Machine icon and select Browse Time Machine Backups.
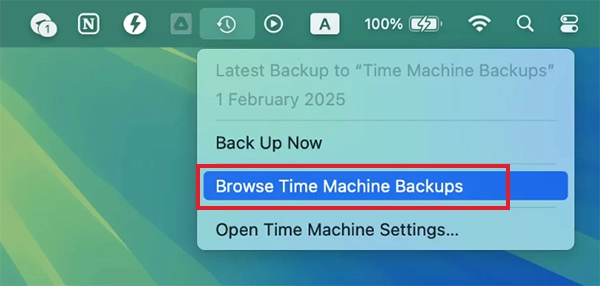
- Select the file you want and click Restore.
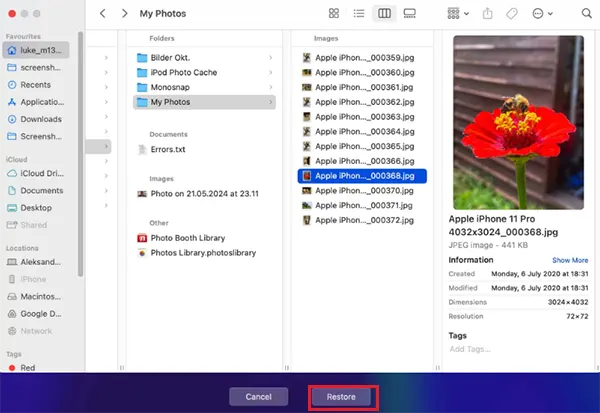
And just like that, your file will return to its original location. Sometimes, you can also retrieve deleted files from the Trash using this method.
Now, if your Mac experiences a major problem or you are setting up a replacement device, you can even restore your entire Mac:
- Connect your Time Machine backup drive.
- Now, start your Mac in macOS Recovery, and select Restore from Time Machine.
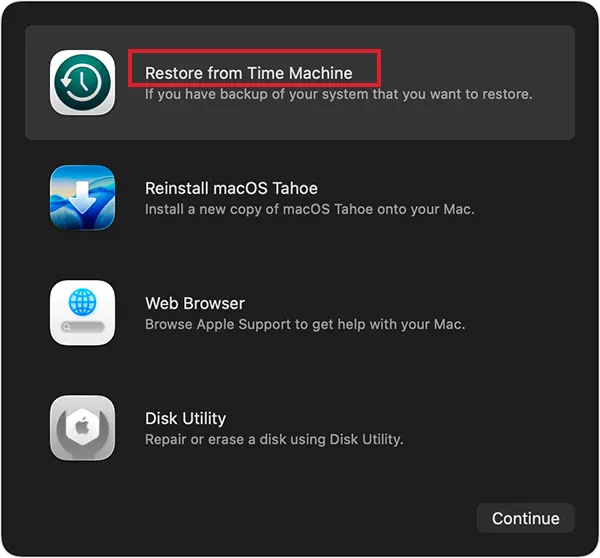
- Choose your backup disk, select the backup version you want, and just follow the on-screen instructions.
Common Mac Time Machine Backup Problems and Quick Fixes
Time Machine is generally reliable, but occasional issues can still occur. Here are some common cases and troubleshooting:
- Backup is Taking Too Long: The first backup can take several hours if your Mac contains large photo libraries, videos, or applications. Try to keep your Mac connected to power and let the backup finish without interruption.
- Backup Disk Not Showing Up: Sometimes, macOS does not recognize the backup drive. In that case, try another cable or port, and check whether the drive appears in Disk Utility.
- Backup Disk is Full: Over time, storage space can become limited. You need to use a large backup drive or free up disk space by reviewing excluded items and older data.
- Time Machine Stops Unexpectedly: Third-party security software, sync services, or a disk issue can interrupt backups. So, quickly run Disk Utility’s First Aid tool and temporarily disable software that may interfere with the backup process.
Also, make sure that the drive is directly connected to your Mac and check your disk health using Disk Utility. Installing available firmware updates from the drive manufacturer can also help in many cases.
However, if nothing works for you, you may need to erase the backup disk and set it up again.
Tips to Keep Your Time Machine Backup Useful
Creating a backup is only half the job done. Maintaining it properly keeps your data protected. Here are a few simple and effective habits worth following:
- Always use a backup drive with sufficient free space. Apple recommends a drive with at least twice your Mac’s storage capacity.
- Connect the drive regularly to reduce the risk of losing recent files.
- Enable backup encryption if the drive contains sensitive information.
- Check backups occasionally and make sure Time Machine is creating backups without errors.
- Replace old backup drives because aging drives are more likely to fail when you need them most.
A backup is only useful if it can be restored, so taking a few minutes to check these things regularly can save a lot of trouble later.
Conclusion
Time Machine remains one of the easiest and most reliable ways to protect your Mac from accidental file loss, hardware failure, and software issues.
It works quietly in the background and requires very little maintenance. Whether you are protecting personal media, work documents, or your entire system, having a recent Time Machine backup gives you a safety net when something unexpected happens.
Frequently Asked Questions
How do I back up my entire Mac?
How often does Time Machine back up my Mac?
Ans. Time Machine creates hourly backups for the last 24 hours, daily backups for the previous month, and weekly backups for your older data.
Can I use Time Machine without an external hard drive?
Ans. No, it requires a backup destination, such as an external hard drive, SSD, or supported network storage device.
Can Time Machine restore deleted files?
Ans. Yes, Time Machine can restore deleted files, folders, and previous versions of documents without restoring your entire Mac.
Is Time Machine better than iCloud backup?
Ans. Both backup methods serve different purposes. Time Machine creates complete Mac backups, while iCloud mainly syncs and stores select data across Apple devices.

Related Posts

Why Your Company Has More Copies of Its Data Than You Think
A 2026 Komprise survey says 74% of IT and storage leaders now manage 5+ PBs of unstructured data. But here…

Why IT Staff Augmentation Is Changing How Tech and Data Recovery Teams Scale
“Outsourcing is inevitable, and I don’t think it’s necessarily treating people like things.” — Stephen Covey (Educator & Businessman) In…

Simple Ways Better Records Save Time At Work
Good record-keeping will make your work easy, convenient, and efficient. Having organized files and information means that the time you…
How to Check SSD Health: A Complete Guide for Windows, Mac, and Linux
An SSD can last for years, but it won’t last forever. Like any storage device, it gradually wears out as…
How to Clear System Data on Mac: Safe Ways to Free Up Storage
System Data is one of the most confusing storage categories on a Mac. If you have checked your storage, noticed…

Corporate Movers for Companies Facing Tight Relocation Timelines
Relocating an office under a tight deadline can be extremely tough, as every hour of downtime affects the overall revenue.…

How to Clear iCloud Storage? 6 Easy Methods to Clear Up the Unwanted Data
Using your iPhone with an iCloud account comes with so many challenges. As you all know, the file size of…
Best macOS External Drive Backup Software for Reliable Mac Backups in 2026
A failed macOS update, a damaged SSD, accidental deletion, or an external drive issue can wipe out years of work…
Why is Syncing with iCloud Paused and How to Fix It?
iCloud is a great tool to keep your photos, messages, notes, and files synced across Apple devices. But sometimes, you…